LAND ROVER ACCESSORY FITTING INSTRUCTIONS

VEHICLE :
PART NO :
KEYWORD :

LAND ROVER

RANGE ROVER VELAR

DOCKING STATION - IPHONE

VPLRV0119

FITTING INSTRUCTION

WARNING
  • Accessories which are not properly fitted can be dangerous. Read the instructions carefully prior to fitting. Comply with instructions at all times. If in doubt, contact your nearest approved retailer.
NOTE
  • Left Hand Drive (LHD) shown, Right Hand Drive (RHD) similar.
NOTE
  • The docking station can be installed in the lower or upper front floor console cup holders, dependent on customer choice. If installing in the upper please note the cup holder lid cannot be closed.
Fitting Instruction
1

Remove both front row seats.

  • Front Row Seat 'with' power seats. For additional information, please refer to the official Workshop Manual. Front Row Seat Head Restraint - Vehicles With: Power Seats (501-10)
  • Front Row Seats 'without' power seats. For additional information, please refer to the official Workshop Manual. Front Row Seat Head Restraint - Vehicles Without: Power Seats (501-10)
2

Remove the floor console upper trim. For additional information, please refer to the official Workshop Manual. Floor Console Upper Trim (501-12)

3

Disconnect and remove the portable media interface panel.

  1. Disconnect (x3) electrical connectors.
  2. Push portable media interface panel from behind into the stowage compartment to release it from (x3) clips.
4

Remove the stowage compartment with (x6) fixings.

5
CAUTION
  • Make sure suitable Personal Protective Equipment (PPE) is worn to prevent injury.

Measure and mark the stowage compartment and then drill hole as illustrated.

6

Install the stowage compartment with (x6) fixings.

  • Torque: 2Nm
7
NOTE
  • The following steps 7 to 13 are for installing in the front cup holder.

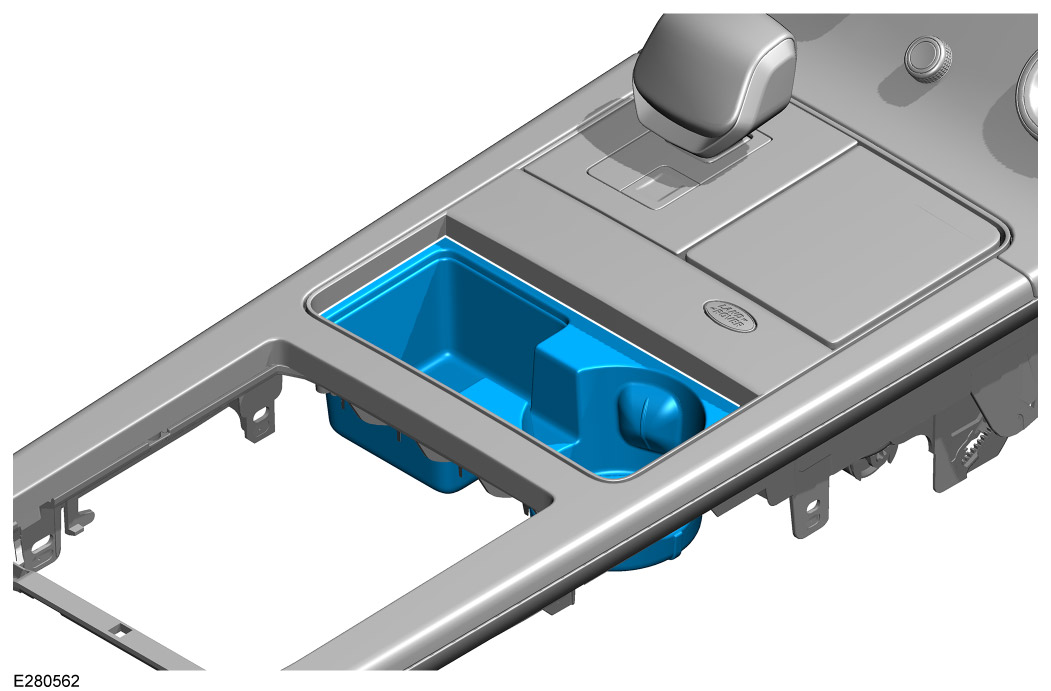
Locate upper cup holder.

  1. Press the button to release the cup holder cover.
  2. Cup holder is revealed.
8
CAUTION
  • Make sure suitable PPE is worn to prevent injury.

Turn the floor console upper trim over and drill a pilot hole from the underside of the cup holder approximately 10mm from the rearward moulding.

9
CAUTION
  • Make sure suitable PPE is worn to prevent injury.

Using the pilot hole as reference, drill a 20mm hole.

10

Cut out the centre of the sticky pad (B).

11

Peel off the protective adhesive foil on pad (B) and stick it onto docking station (A).

12

Feed the docking station harness through the drilled hole and install the docking station (A) into the upper cup holder.

13

Secure the grommet.

14
NOTE
  • The following steps 14 to 20 are for installing in the lower cup holder.

Remove the lower cup holder from the floor console upper trim. For additional information, please refer to the official Workshop Manual. Floor Console Upper Trim (501-12)

15
CAUTION
  • Make sure suitable PPE is worn to prevent injury.
  • Securely hold the cup holder in position when drilling.

Drill a 20mm hole depending on vehicle market, in the area illustrated.

16

Install the lower cup holder back to the floor console upper trim. For additional information, please refer to the official Workshop Manual. Floor Console Upper Trim (501-12)

17

Position the harness in the docking station (A) base, depending on vehicle market.

18

Peel off the protective adhesive foil on pad (B) and stick it onto docking station (A).

19

Feed the docking station harness through the drilled hole and install the docking station (A) into the lower cup holder.

20

Secure the grommet.

21
NOTE
  • Left Hand Drive (LHD) market is shown. The Right Hand Drive (RHD) market is the same but on the other side of the centre console.

With the floor console upper trim lowered feed the harness through the areas shown to the rear of the unit.

22

Connect and install the portable media interface panel.

  1. Push portable media interface panel from inside the stowage compartment to clip it back into place with its (x3) clips.
  2. Connect (x3) electrical connectors.
23

Install the floor console upper trim. For additional information, please refer to the official Workshop Manual. Floor Console Upper Trim (501-12)

24

Connect docking station to the USB socket.

25

Install both front row seats.

  • Front Row Seat 'with' power seats. For additional information, please refer to the official Workshop Manual. Front Row Seat Head Restraint - Vehicles With: Power Seats (501-10)
  • Front Row Seats 'without' power seats. For additional information, please refer to the official Workshop Manual. Front Row Seat Head Restraint - Vehicles Without: Power Seats (501-10)
26

Check the operation of the docking station.

© Land Rover 2016