LAND ROVER ACCESSORY FITTING INSTRUCTIONS

VEHICLE :
PART NO :
KEYWORD :

LAND ROVER

RANGE ROVER VELAR

MUD FLAPS - REAR

VPLYP0375

FITTING INSTRUCTION

WARNING
  • Accessories which are not properly installed can be dangerous. Read the instructions carefully prior to fitting. Comply with instructions at all times. If in doubt, contact your nearest approved retailer.

Warnings / Cautions / Notes

CAUTION
  • If protective wax has been applied to the vehicle it must be thoroughly removed before starting this procedure.
  • The vehicle must be clean, dry and at workshop temperature. Vehicles moved into the workshop from cold or wet conditions should be dried and left to stand for a minimum of 2 hours.

Rear Mudflaps (Bill of Materials)

Tooling

Tooling
Manual screwdriver kit
Ruler
Sharp pick (for position marking)
Drill (Ø10mm)
Retaining nut removal and installation tool
Torque Wrench/Screw Driver (range up to 5Nm). Recommended GE5.3: 1/4 dr torque screwdriver for 56 - 451 N/cm (0.56 - 4.5 Nm)
Paint markers for metal
Fitting Instruction
NOTE
  • Left side shown. Right side is similar.
1
WARNING
  • Make sure to support the vehicle with axle stands.

Raise and support the vehicle using a suitable lift.

  • For additional information, please refer to the official Workshop Manual. Lifting (100-02)
2

Remove the rear wheels.

  • For additional information, please refer to the official Workshop Manual. Wheel and Tire (204-04)
3

Release the rear wheel arch liner.

4
CAUTION
  • Failure to follow this step may result in damage to the vehicle.

Drill a 10mm hole in the illustrated position.

5
CAUTION
  • Make sure that the component is correctly located.

Position the mudflap (A) in the illustrated position.

6

Mark the position of the lower mounting point.

7

Remove the mudflap.

8
CAUTION
  • If in doubt, repeat steps 5 to 7.

Drill a 10mm hole at the previously marked position.

9
CAUTION
  • Do not remove the backing from the adhesive tape.

Inspect and make sure that the holes are correctly aligned.

10
WARNING
  • Make sure to wear suitable personal protective equipment.
CAUTION
  • Allow to dry for a minimum of 60 seconds before proceeding to the next step.

Using the supplied cleaner (C) clean the highlighted area.

11
WARNING
  • Make sure to wear suitable personal protective equipment.
CAUTION
  • Allow to dry for a minimum of 60 seconds before proceeding to the next step.

Apply the supplied adhesion promoter (D) to the highlighted area.

12

On mudflap (A) remove the backing from the adhesive tape.

13
WARNING
  • Tightening the fixing studs above the specified torque level will result in joint failure / stud breaking.
  • Any claims due to improper torque assembly will be rejected.
CAUTION
  • Make sure that the component is correctly positioned prior to adhesive tape application.
  • Use the Jaguar Land Rover approved torque wrenches to achieve the required torque.

Install the mudflap.

  1. Position the mudflap (A).
  2. Secure the mudflap using the nut (E) and the washer (F).
  3. Using a suitable hand torque wrench, tighten the nut to the required torque. Apply a paint mark (white/yellow) on the stud, nut and washer when the right torque is reached.
  4. Torque: 2Nm
14
CAUTION
  • Make sure that the washers are positioned as illustrated.

Install the bracket.

  1. Position the inner bracket (B).
  2. Secure the inner bracket to the mudflap as illustrated.
  3. Torque: 2Nm
15

Secure the inner bracket as illustrated.

  • Torque: 2Nm
16
NOTE
  • To aid installation, install the screws in the illustrated sequence.

Secure the rear wheel arch liner.

17
NOTE
  • If a gap is visible this will not affect the performance of the rear mudflap.

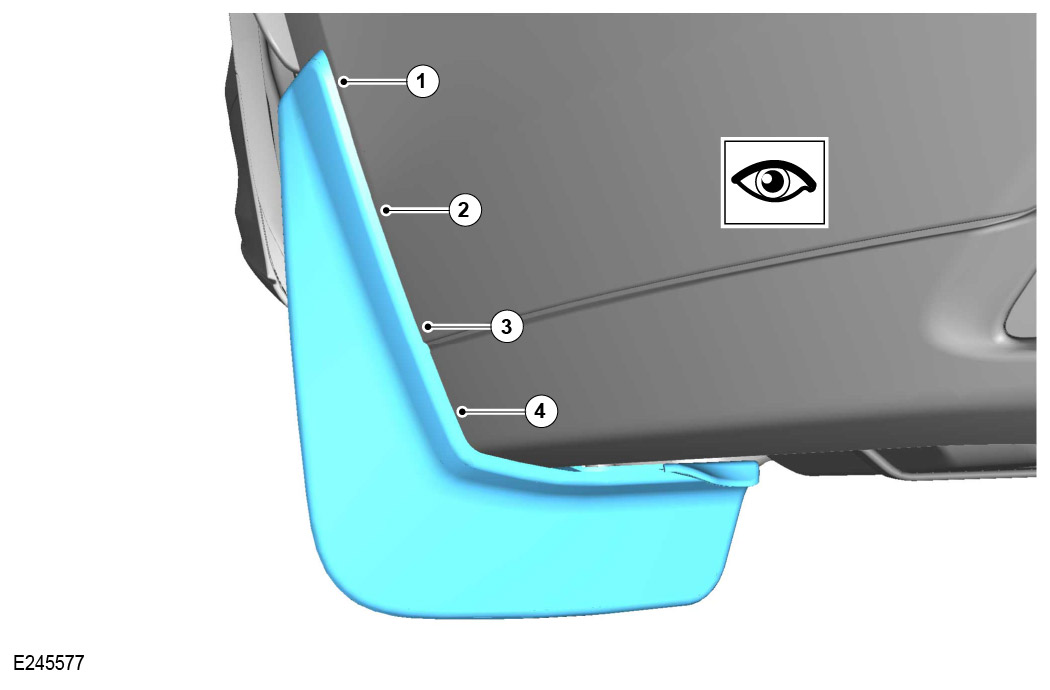
When the rear mudflaps are fully installed to the bumper assembly.

  1. A maximum gap of 0.5 mm is expected at the location point (1) between the bumper skin and the rear mudflap.
  2. A maximum gap of 1.0 mm is expected at the location point (2) between the bumper skin and the rear mudflap.
  3. A maximum gap of 0.5 mm is expected at the location point (3) between the valance and the rear mudflap.
  4. A maximum gap of 1.5 mm is expected at the location point (4) between the lower valance and the rear mudflap.
18

Install the rear wheels.

  • For additional information, please refer to the official Workshop Manual. Wheel and Tire (204-04)
© Land Rover 2016