LAND ROVER ACCESSORY FITTING INSTRUCTIONS

VEHICLE :
PART NO :
KEYWORD :

LAND ROVER

DEFENDER

MUD FLAPS - REAR - OCTA

VPLLE0003

FITTING INSTRUCTION

WARNING
  • Accessories which are not correctly installed can be dangerous. Read the instructions carefully prior to ordering and installation to make sure this accessory is applicable to your variant of vehicle. Comply with instructions at all times. If in doubt, contact your nearest approved retailer.
Accessory Kits Required Part Number
Rear Mudflaps VPLLE0003

Rear Mudflaps (Bill Of Materials)

NOTE
  • Parts (A) are handed depending on which side of the vehicle they are to be installed on. See image below to determine what parts are for the left and right side of the vehicle before installation.
Parts List Quantity
(A) Rear Mudflap x2
(B) M6x20 Fixing x4
(C) M6 Fixing x4
(D) M6 Washer x8

Warnings / Cautions / Notes

NOTE
  • This procedure contains illustrations for left side of vehicle, right side is similar. Repeat steps for right side.
  • The vehicle must be clean and dry before installation.
  • Paid subscription to TOPIX required to view workshop manual links.
Fitting Instruction
1
WARNING
  • Make sure that the vehicle is stable before completing any work.
  • If a suitable 2 pillar lift is not available then refer to the wheel changing section of the owner's handbook.

Raise and support the vehicle on a suitable 2 pillar lift.

  • Log into TOPIX and enter your 17 character 'Vehicle Identification Number' and navigate to 'Workshop Manual' section '100-02 Jacking and Lifting'.
2
WARNING
  • The wheel and tire assembly will be heavy.
CAUTION
  • Using power tools may result in damage to the wheel nuts. Make sure the wheel nuts are removed and installed using hand tools only.
NOTE
  • The locking wheel nuts can be removed and installed using the special adapter only, provided in the vehicle tool kit.

Remove x5 fixings to remove the rear wheel.

  • Log into TOPIX and enter your 17 character 'Vehicle Identification Number' and navigate to 'Workshop Manual' section '204-04 Wheel and Tire'.
3
CAUTION
  • Protect the surrounding paintwork to avoid damage.

Using a plastic trim tool to release the rear wheel spat from its x8 or x9 clips depending on vehicle variant and pull away. If your vehicle has side lamp markers then you must disconnect the electrical connecter.

4
CAUTION
  • Protect the surrounding paintwork to avoid damage.
NOTE
  • Retain fixings.

Remove both upper and lower fixings. Then using a plastic trim tool insert behind the upper tab on bumper trim and remove tab from bumper. Then move tool along trim and remove a further x4 clips to fully remove.

5

Using the bottom fixing removed in step 4. Install the rear bumper to the heat shield. Torque: 2.5Nm

6

Remove x2 fixings and x2 plastic nuts from the rear bumper.

7

Clean working area.

8

Remove x3 clips on the rear wheel arch liner. Then move aside to gain access behind.

9

Prepare the rear mudflap (A) before installation.

  1. Install fixings (B) and (D).
10

Install the rear mudflap(A).

  1. Inspect to see if x2 clips are already installed to the rear mudflap before installation.
  2. Push up the rear mudflap clips into the (black arrow) holes shown to clip into place and make sure the pre-installed fixings go into the (white arrow) holes. An audible click will be heard when the clips are correctly installed.
11
CAUTION
  • Torque wrench must be used to avoid overtightening and warping of the mudflap.

Install the rear mudflap(A) to vehicle.

  1. Using the top fixing removed in step 4, install the rear mudflap (black arrow). Torque: 3Nm
  2. Install fixings and washers (C) and (D). Torque: 2.5Nm
12

Inspect the alignment at the arrowed locations. Make sure there is no more than a 1mm gap between the rear mudflap and the rear bumper.

13

Return the rear wheel arch liner back to its original position and install x3 clips.

14

Do another inspection of the alignment at the arrowed locations. Make sure there is no more than a 1mm gap between the rear mudflap and the rear bumper.

15

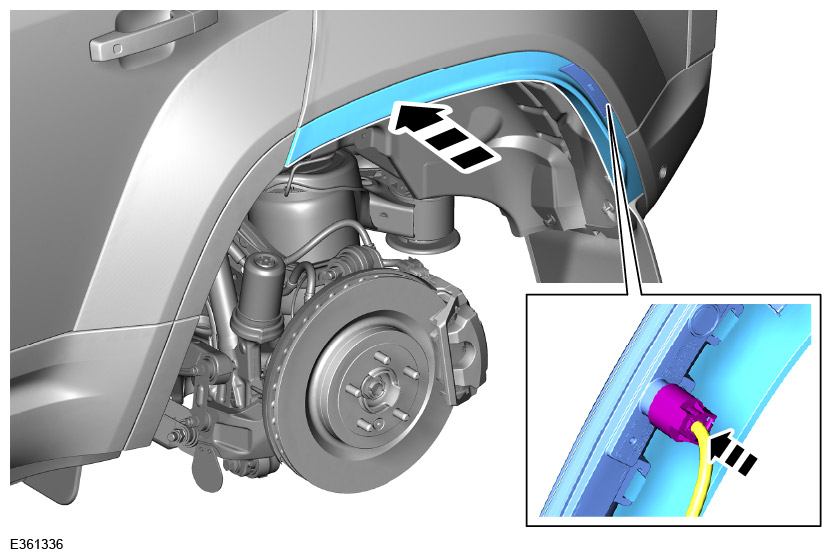
If your vehicle has side lamp markers then you must connect the electrical connecter first. Then install the rear wheel spat by pushing it back into place with x8 or x9 clips depending on vehicle variant. An audible click will be heard when correctly installed.

16
WARNING
  • The wheel and tire assembly will be heavy.
CAUTION
  • Using power tools may result in damage to the wheel nuts. Make sure the wheel nuts are removed and installed using hand tools only.
NOTE
  • The locking wheel nuts can be removed and installed using the special adapter only, provided in the vehicle tool kit.

Install x5 fixings to install the rear wheel.

  • Log into TOPIX and enter your 17 character 'Vehicle Identification Number' and navigate to 'Workshop Manual' section '204-04 Wheel and Tire'.
17

Lower vehicle on ramp and do a final inspection of the installed rear mudflaps to make sure they are installed correctly.

© Land Rover 2016