LAND ROVER ACCESSORY FITTING INSTRUCTIONS

VEHICLE :
PART NO :
KEYWORD :

LAND ROVER

DEFENDER

MUD FLAPS - FRONT - OCTA

VPLLE0002

FITTING INSTRUCTION

WARNING
  • Accessories which are not correctly installed can be dangerous. Read the instructions carefully prior to ordering and installation to make sure this accessory is applicable to your variant of vehicle. Comply with instructions at all times. If in doubt, contact your nearest approved retailer.
Accessory Kits Required Part Number
Front Mudflaps VPLLE0002

Front Mudflaps (Bill Of Materials)

NOTE
  • Parts (A) and (B) are handed depending on which side of the vehicle they are to be installed on. See image below to determine what parts are for the left and right side of the vehicle before installation.
Parts List Quantity
(A) Front Mudflap x2
(B) Bracket x2
(C) M6 Nyloc Nut x4
(D) M6 Washer x6
(E) M6.5 Stepped Washer x4
(F) M6x20 Fixing x6
(G) M6 Standard Nut x2

Warnings / Cautions / Notes

WARNING
  • Make sure to wear suitable personal protective equipment when drilling.
NOTE
  • This procedure contains illustrations for left side of vehicle, right side is similar. Repeat steps for right side.
  • The vehicle must be clean and dry before installation.
  • Paid subscription to TOPIX required to view workshop manual links.
Fitting Instruction
1
WARNING
  • Make sure that the vehicle is stable before completing any work.
  • If a suitable 2 pillar lift is not available then refer to the wheel changing section of the owner's handbook.

Raise and support the vehicle on a suitable 2 pillar lift.

  • Log into TOPIX and enter your 17 character 'Vehicle Identification Number' and navigate to 'Workshop Manual' section '100-02 Jacking and Lifting'.
2
WARNING
  • The wheel and tire assembly will be heavy.
CAUTION
  • Using power tools may result in damage to the wheel nuts. Make sure the wheel nuts are removed and installed using hand tools only.
NOTE
  • The locking wheel nuts can be removed and installed using the special adapter only, provided in the vehicle tool kit.

Remove x5 fixings to remove the front wheel.

  • Log into TOPIX and enter your 17 character 'Vehicle Identification Number' and navigate to 'Workshop Manual' section '204-04 Wheel and Tire'.
3

Remove x4 clips on front wheel arch liner. Then move aside to gain access behind.

4

Remove the front fender finisher using a trim tool to release part from x3 clips and pull away.

5

Clean working area.

6

Tape the area around the previously removed ‘Front Fender Finisher’ to make sure no damage occurs.

7

Remove the x4 tabs.

  1. Using a 'Oscillating Multi Tool' remove x4 tabs.
  2. Make sure the area is deburred from sanding and that the surface is smooth .
  3. Remove tape applied in previous step.
8
CAUTION
  • Do not engage front mudflap clips at this point.

Offer up the front mudflap (A) into position.

  1. Using the location pin (white arrow) to guide the mudflap onto the front fender.
9
CAUTION
  • Take care to mark the hole position accurately.

Use the front mudflap as a guide to carefully mark the hole positions on the sill as illustrated.

10

Drill the hole at the marked position on the sill.

  1. Remove the front mudflap.
  2. Using a 10mm Drill bit, drill the marked hole.
11

Prepare the front mudflap (A) before installation.

  1. Slide fixing (F) into the slot on the front mudflap.
  2. To avoid scratching the mudflaps on installation make sure masking tape is applied below the x2 fixings holes.
12
NOTE
  • 'ONLY' hand tighten fixings.

Prepare the front mudflap (A) before installation.

  1. Place bracket (B) onto the front mudflap as shown.
  2. Install and hand tighten fixings (C), (D), (E) and (F).
13

Inspect the front mudflap (A) before installation.

  1. Inspect to see if all x3 clips (black arrows) are already installed to the front mudflap before installation.
  2. The pin and fixing (white arrows) will be to guide the mudflap onto the front fender in the next step.
14

Install the front mudflap (A).

  1. Offer up the front mudflap (A) to the vehicle and first make sure that bracket (B) is correctly positioned before pushing the clips into place. The bracket needs to be between the rocker panel and the sill bracket, lining up the bracket end hole with the hole you have just drilled (black arrow). Make sure the lip of the bracket is facing towards the front of the vehicle.
  2. Using the location pin and fixing (white arrows in previous step) to guide the mudflap onto the front fender. Then push on the clip locations to engage the clips. An audible click will be heard when correctly installed.
15

Install the front mudflap.

  1. Install fixings (C), (D), (E) and (F). Torque: 2.5Nm
  2. Tighten fixing (black arrow) . Torque: 2.5Nm
  3. Remove all masking tape from the front mudflap.
16

Install the front mudflap. Install fixing (G) and washer (D). Torque: 2.5Nm

17

Return the front wheel arch liner back to its original position and install x4 clips.

18

Inspect the alignment at the arrowed locations. Make sure there is no more than a 1mm gap between the front mudflap and the front fender moulding.

19

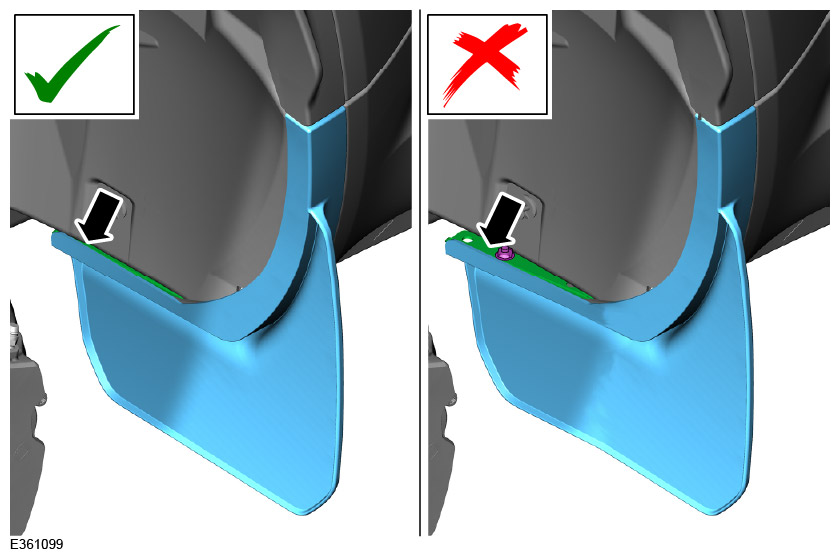
Do a final inspection to make sure the metal bracket is correctly positioned. The metal bracket should be hidden under the front wheel arch liner and not protruding out.

20
WARNING
  • The wheel and tire assembly will be heavy.
CAUTION
  • Using power tools may result in damage to the wheel nuts. Make sure the wheel nuts are removed and installed using hand tools only.
NOTE
  • The locking wheel nuts can be removed and installed using the special adapter only, provided in the vehicle tool kit.

Install x5 fixings to install the front wheel.

  • Log into TOPIX and enter your 17 character 'Vehicle Identification Number' and navigate to 'Workshop Manual' section '204-04 Wheel and Tire'.
21

Lower vehicle on ramp and do a final inspection of the installed front mudflaps to make sure they are installed correctly.

© Land Rover 2016