LAND ROVER ACCESSORY FITTING INSTRUCTIONS

VEHICLE :
PART NO :
KEYWORD :

LAND ROVER

DEFENDER

MUD FLAPS - REAR - 130

VPLEP0504 / VPLEP0505 / VPLLE0015

FITTING INSTRUCTION

WARNING
  • Accessories which are not correctly installed can be dangerous.
  • Before ordering and installing the accessory, you must read all the instructions. The correct accessory / part must be ordered for your variant of the vehicle from the table below.
  • You must follow all instructions. If in doubt, contact your nearest approved retailer.
Accessory Kits Part Number Vehicle Variant
Standard Rear Mudflaps (washer M6x12 (D) version) VPLEP0505 Defender 130 only
Standard Rear Mudflaps (washer M6x14 (D) version) TBC Defender 130 only
Classic Rear Mudflaps with 'LAND ROVER' Logo (washer M6x12 (D) version) VPLEP0504 Defender 130 only
Classic Rear Mudflaps with 'DEFENDER' Logo (washer M6x14 (D) version) VPLLE0015 Defender 130 only

Rear Mudflaps - washer M6x12 (D) version (Bill of Materials)

CAUTION
  • Kit may come with older templates (B) that are no longer required. The best practice is to always go to 'Step 4' and print out the current, correct templates.
Bill Of Materials Quantity Replacement Service Part Number
(A) Front Mudflaps (Standard or Classic) 2 Available in complete kit only
(B) Templates 2 See 'Step 4'
(C) Washer - M6x18 4 Available in complete kit only
(D) Washer - M6x12 8 Available in complete kit only
(E) Fixing - M6 8 Available in complete kit only
(F) Fixing - M6x20 4 Available in complete kit only
(G) Stepped Washer - M6 4 Available in complete kit only

Rear Mudflaps - washer M6x14 (D) version (Bill of Materials)

Bill Of Materials Quantity Replacement Service Part Number
(A) Front Mudflaps (Standard or Classic) 2 Available in complete kit only
(B) Templates 2 See 'Step 4'
(C) Washer - M6x18 4 Available in complete kit only
(D) Washer - M6x14 8 Available in complete kit only
(E) Fixing - M6 8 Available in complete kit only
(F) Fixing - M6x20 4 Available in complete kit only
(G) Stepped Washer - M6 4 Available in complete kit only

Warnings / Cautions / Notes / Tooling and Equipment

WARNING
  • Always wear appropriate personal protective equipment when drilling.
CAUTION
  • Protect the surrounding paintwork and trim to avoid damage.
  • Use the Jaguar Land Rover (JLR) approved torque wrenches to achieve the required torque. Overtightening the fixing studs beyond the specified torque level may result in joint failure or stud breakage. Claims related to improper torque assembly will be rejected.
  • If protective wax has been applied to the vehicle it must be thoroughly removed before starting this procedure.
  • Clean the areas where the front mudflaps will be installed before installation.
NOTE
  • Install the accessory kit on one side of the vehicle first before doing the other side.
  • These instructions illustrate the left side of the vehicle. The right side is installed in a similar manner.
  • The following instructions are applicable to the installation of both the Standard and Classic mudflaps (Standard mudflaps are only shown in the images, unless stated).
Tooling and Equipment
Trim clip removal tool
Ruler
Sharp pick (for position marking)
Drill and bits set
Masking tape
File or de-burring tool
Torque Wrench
Socket Set
Scissors
Paint markers for metal
Printer
Fitting Instruction
1
WARNING
  • Vehicle must be stable before completing any work.

Position the vehicle on a ramp and raise it.

  • Log into TOPIX and enter your 'Vehicle Identification Number' and navigate to 'Workshop Manual' section '100-02 Jacking and Lifting'.
2
WARNING
  • The wheel and tire assembly will be heavy.
CAUTION
  • The locking wheel nuts can be removed and installed using the special adapter only, provided in the tool kit.
  • Using power tools may result in damage to the wheel nuts. Wheel nuts must be removed and installed using hand tools only.

Remove rear wheel.

  • Remove 5 wheel nuts.
  • Remove the wheel and tire.
3

Accessing behind the rear wheel arch liner.

  1. Remove 5 clips from the rear wheel arch liner.
  2. Move the liner aside to gain access behind.
4
CAUTION
  • Be aware that (small washer) kits may include older templates (B) which is no longer needed. Always refer to the links below to download and print the current, correct templates.
  • Templates must be printed on A3 paper at 100% without adjusting the page size. Verify the dimensions using the included scale after printing.

Carefully cut out the supplied templates (B) using scissors, following the cut guidelines exactly.

5
NOTE
  • This step ONLY applies to vehicles with installed 'Wheel Arch Protection'.

Modify both templates (B).

  • Cut the template at the line indicated with the asterisk (*). This must be done because your template will not be able to sit flush on the rear bumper if the 'Wheel Arch Protection' is installed.
6
CAUTION
  • Incorrect template positioning will result in holes drilled in the wrong locations.
NOTE
  • Clean the areas of the rear bumper where the rear mudflaps will be installed to before applying the template.

Attach template (B) to the rear bumper.

  1. Align the side of the template flush with the outer edge of the rear bumper, using a ruler to aid precision.
  2. Align the bottom of the template along the point shown on the rear bumper.
  3. When in position fasten the template securely using suitable tape.
7
CAUTION
  • Make markings precisely in the center of the template hole positions.

Mark-up drilling positions onto the rear bumper.

  1. Use a sharp pick to mark drilling 2 drilling positions onto the rear bumper.
  2. Remove template before drilling.
8

Drill holes exactly at the marked positions.

  1. Drill 2 holes using a 9mm drill bit.
  2. Use a suitable file to remove any remaining plastic debris, making sure edges around the holes are clean.
9
NOTE
  • This step only applies to Standard Rear Mudflaps.

Offer up the rear mudflap (A) against the rear bumper.

  1. Insert the rear mudflap upper stud into the top hole.
  2. Flex the mudflap and insert the rear mudflap lower stud into the lower hole.
10
CAUTION
  • Make markings precisely in the center of the mudflap fixing holes.
NOTE
  • This step only applies to Standard Rear Mudflaps.

Mark the drill locations.

  1. When marking up, the gap between the rear mudflap and the rear bumper must be no more than 1.5mm.
  2. Use a sharp pick to mark 2 drilling positions onto the rear bumper.
  3. Remove the rear mudflap.
11
NOTE
  • This step only applies to Standard Rear Mudflaps.

Drill holes exactly at the marked positions.

  1. Drill 2 holes using a 10mm drill bit.
  2. Use a suitable file to remove any remaining plastic debris, making sure edges around the holes are clean.
12
NOTE
  • This step only applies to Classic Rear Mudflaps.

Due to the design of the classic rear mudflaps it will be difficult to get an accurate mark for the center of the holes on the bottom fixings when offered up to the vehicle. So measurements will be required instead.

  1. Measurements are started from the inner radius of the rear bumper edge and not the outer edge.
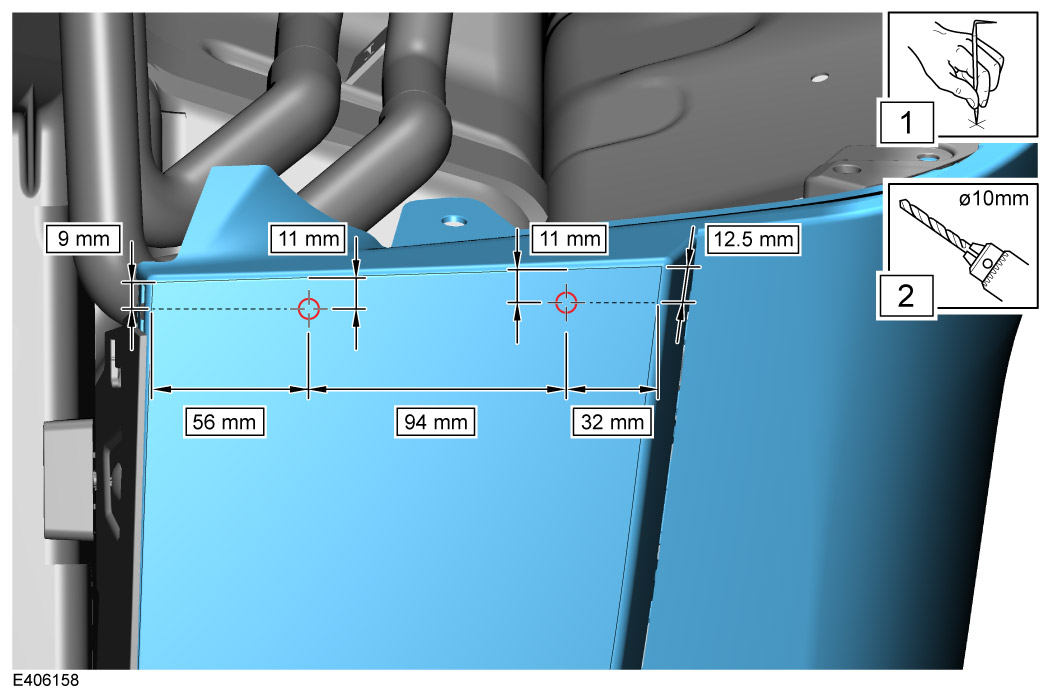
  2. Measure and mark as illustrated onto the underneath of the rear bumper.
  3. Drill the marked holes using a 10mm drill bit.
  4. Use a suitable file to remove any remaining plastic debris, making sure edges around the holes are clean.
13
NOTE
  • This step only applies to Classic Rear Mudflaps.
  • The rear classic mudflap can be flexed back considerably to allow access for pre-assembling fixings.

Prepare classic rear mudflap.

  1. To avoid scratching the mudflaps, masking tape must be applied below the arrowed holes.
  2. Pre-assemble fixings (F) and stepped washers (G).
14

Offer up the rear mudflap (A) against the rear bumper.

  1. Insert the rear mudflap upper stud into the top hole.
  2. Flex the mudflap and insert the rear mudflap lower stud into the lower hole.
15
NOTE
  • Overtightening the fixing studs beyond the specified torque level may result in joint failure or stud breakage.

Install the rear mudflap top fixings.

  1. Install 2 fixings (E) with 4 washers (D) to the mudflap studs. Torque: 2.5Nm
  2. Apply a paint mark (white/yellow) on the stud, fixing and washer when the correct torque is reached.
16
NOTE
  • If installing the classic mudflap then fixings (F) and (G) will already be pre-installed in 'Step 12'.

Install the rear mudflap lower fixings.

  1. Install 2 fixings (F) with 2 stepped washers (G).
  2. Install 2 fixings (E) with 2 washers (C) and 2 fixings. Torque: 2.5Nm
  3. Remove masting tape from the rear mudflap if present.
17

Inspect the alignment at the arrowed locations.

  • There must be no more than a 1.5mm gap between the rear mudflap and the rear bumper.
18
NOTE
  • Retaining clips must be correctly installed.

Install rear wheel arch liner.

  1. Move the rear wheel arch liner back into position.
  2. Install 5 original clips.
19
WARNING
  • The wheel and tire assembly will be heavy.
  • Apply a small amount of grease to the bore and spigot areas of the wheel before installation. The grease must not come into contact with the vehicles braking components and the wheel stud threads. Failure to follow these instructions may result in personal injury.

Install the rear wheel and tire. Install and tighten 5 fixings in the illustrated sequence in 3 tightening steps.

  • Stage 1: Torque 4Nm
  • Stage 2: Torque 70Nm
  • Stage 3: Torque 140Nm
20

Final inspection.

  1. Lower the vehicle on the ramp.
  2. Inspect the installed rear mudflaps to make sure they are properly installed and aligned before customer handover.
© Land Rover 2016