LAND ROVER ACCESSORY FITTING INSTRUCTIONS

VEHICLE :
PART NO :
KEYWORD :

LAND ROVER

DEFENDER

LOADSPACE PARTITION - 130

VPLES0650

FITTING INSTRUCTION

WARNING
  • Accessories which are not correctly installed can be dangerous. Read the instructions carefully prior to ordering and installation to make sure this accessory is applicable to your variant of vehicle. Comply with instructions at all times. If in doubt, contact your nearest approved retailer.
Kits Required Part Number
Loadspace Partition - Full Height VPLES0650

Loadspace Partition - Full Height (Bill Of Materials)

Description Quantity
(A) Loadspace Partition x1
(A1) M8 x 55 Anchor point bolt x2
(A2) M8 x 28 D-loop bolt x2
(A3) 20mm Thumb Screw - with x1 spring washer and x1 plastic washer x2
(A4) 20mm Thumb Screw - with x1 spring washer and x2 plastic washers x1
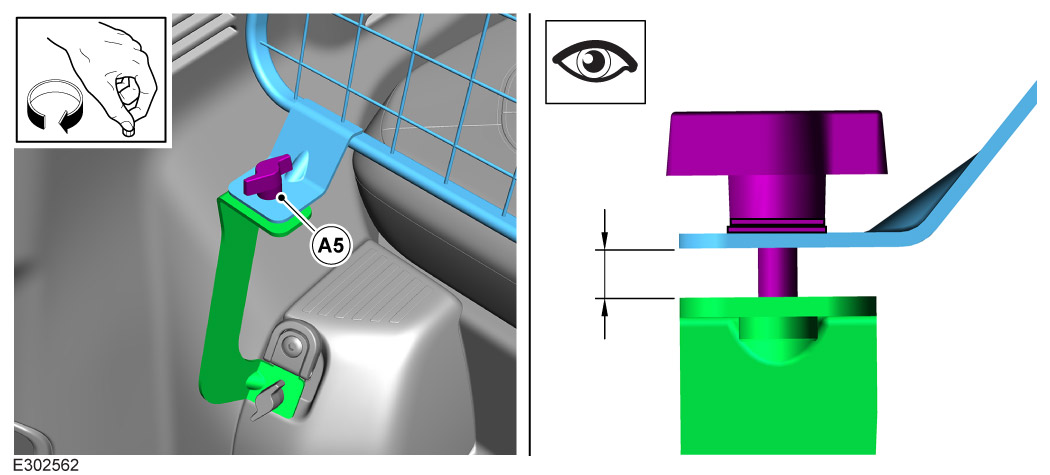
(A5) 30mm Thumb Screw - with x1 spring washer and x1 plastic washer x2
(B) Anchor Point Bracket x2
(C1) Lower support bracket RH x1
(C2) Lower support bracket LH x1

Warnings / Cautions / Notes

WARNING
  • Third row seats must not be used when the cargo barrier is installed.

Tooling

Tooling
H5 Allen Head Socket
H6 Allen Head Socket
T40 Torx Head Socket
Torque Wrench (10-24Nm)
Small Trim Removal Tool
Fitting Instruction
NOTE
  • The following steps are to be completed on both sides of the vehicle.
1

Use a suitable trim tool to open the loadspace partition mounting slot cover on both sides of the vehicle.

  1. Insert the trim tool into the cutout.
  2. Open the loadspace partition mounting slot cover.
  3. Store covers securely.
2
NOTE
  • Store D-loop fixings in a secure location as these are required when the barrier is not installed.

Remove D-Loops and retain bolts.

3
NOTE
  • Make sure the bracket is in correct orientation as shown after tightening.

Install the D-Loop anchor point brackets (B) using fixing (A1).

  • Torque: 24Nm
4
CAUTION
  • Only use the replacement D-Loop bolts (A2) supplied in the kit.

Hand tighten the D-Loop anchor point to the bracket (B) using bolt (A2).

5

Tighten bolt (A2). Use the wench extension tool to try to stop the D-loop and bracket from moving when tightening.

  • Torque: 24Nm
6

If the D-loop and bracket does move you can use the wench extension tool as shown to move the D-loop and bracket back into the correct position (see next step for correct orientation).

7

Inspect D-loop and bracket is positioned as illustrated before proceeding to next step.

8
NOTE
  • Make sure the spring washer and then the plastic washer are installed on the thumb screw bolt before use.
  • Do not fully tighten the screws at this point.
  • Brackets are handed for the right (C2) and left (C1) side of the vehicle.

Install the lower support brackets to the D-Loop anchor point brackets using the 20mm thumb screws (A3). Then repeat steps

9
NOTE
  • Refer to Owners Handbook for operation.

Lower third row seats.

10
NOTE
  • Refer to Owners Handbook for operation.
  • Not all seat variants will be able to move forward.

Fold the headrests down and adjust the second row seats to the lowest and most forward position.

11
NOTE
  • Place the spring washer then plastic washer on to the thumb screw bolt before use. When the screw is inserted through the door add a plastic washer onto the thread before screwing into the loadspace partition.

Install the 20mm thumb screw (A4) into the loadspace partition access door.

12
NOTE
  • Make sure ski hatch thumb screw is facing to the rear of the vehicle for correct orientation.

Install the loadspace partition (A) into the vehicle.

13

Locate and secure the loadspace partition to the top anchor point in the vehicle headliner.

14
NOTE
  • Make sure the spring washer and then the plastic washer are installed on the thumb screw bolt before use.

Install the lower loadspace partition brackets to the lower support brackets with the 30mm thumb screws (A5). Rotate the lower bracket for correct hole alignment between the barrier and the bracket before securing thumb screw.

  • There is designed into the part to be a gap between the mounting bracket on the barrier. This is to allow for body tolerances.
15

Fully tighten the thumb screws (A3) on the lower support brackets.

16
CAUTION
  • Make sure the second row seat backrest does not touch the 'Loadspace Partition - Full Height' in the reclined position.

Return the second row seats to their upright position.

17

Make sure the loadspace partition is secure and correctly installed before driving the vehicle.

18

Opening the full height loadspace partition access door.

  1. Release the thumbscrew.
  2. Lower the access door.
19

After covering the indicated distances, inspect that all the thumbscrews remain appropriately tightened.

  • 500 km or 300 miles.
  • 1000 km or 600 miles.
© Land Rover 2016