LAND ROVER ACCESSORY FITTING INSTRUCTIONS

VEHICLE :
PART NO :
KEYWORD :

LAND ROVER

DEFENDER

SKI AND SNOWBOARD CARRIER

VPLZR0187

FITTING INSTRUCTION

WARNING
  • Accessories which are not correctly installed can be dangerous. Read the instructions carefully prior to installation. Comply with instructions at all times. If in doubt, contact your nearest approved retailer.
  • Do not exceed 130 km/h (80 mph).
  • Always secure long loads, those significantly exceeding the length of the roof, at the ends of the vehicle.
  • Mount the skis pointing backward in the carriers.
  • Make sure the tailgate does not clash with the load.
  • Mount the skis with the bindings against the ski and snowboard carrier.
  • Be aware of the ski bindings damaging the roof of the vehicle.
  • Make sure the load is level.
  • Be aware of the increased height of the vehicle.
  • The ski and snowboard carrier can carry a maximum of 5 pairs of skis or 2 snowboards.
  • Make sure the load is secure before starting a journey.
  • Remove the roof cross bars, ski/snowboard carrier and any gear before using an automatic car wash.
NOTE
  • This procedure contains some variation in the illustrations depending on the vehicle specification, but the essential information is always correct.
  • The ski and snowboard carrier is to be used with the roof cross bars.
  • The locking system used on this accessory is compatible with the Thule key system. To order replacement keys, refer to your local Thule dealer/website and quote the number stamped into the face of the lock cylinder, e.g - N123. For this accessory, the key model number begins with 1500000***, so for example, the model number for key number N123 would be 1500000123.

Ski and Snowboard Carrier - (Bill Of Materials).

NOTE
  • Part (G) is not required in these instructions and can be discarded.
Description Part Number
Land Rover Ski and Snowboard Carrier VPLZR0187
Jaguar Ski and Snowboard Carrier T2H45726

Types of roof cross bar used on your vehicle.

Visual aid of how the ski's should be fitted.

REMOVAL INSTRUCTIONS
1

Unlock and remove the roof cross bar end caps.

2

Slide out both of the trims from the roof cross bars.

3


  1. Using a suitable cutting tool, cut the roof cross bar trims as illustrated.
  2. Discard the smallest sections of the roof cross bar trim.
Fitting Instruction
1


  1. Insert the roof cross bar trim and the fixing (H) into the roof cross bar as illustrated.
  2. Install and lock the roof cross bar end caps.
2

Install the ski and snowboard carrier feet using the location holes.

3

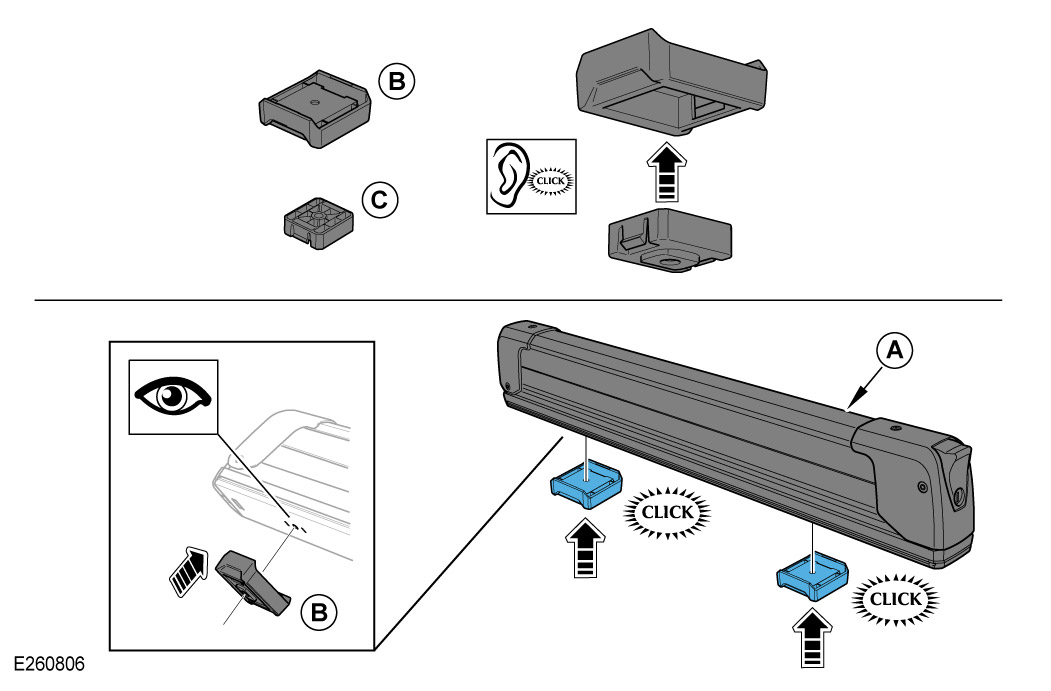
Install the key barrel in the ski and snowboard carrier (A).

  1. Unlock the carrier.
  2. Push in the release button.
  3. Raise the ski and snowboard carrier top section.
4
NOTE
  • Install the nut hex key upwards.

Install the nut (J) into the base of the ski and snowboard carrier.

  1. Unlock the carrier base.
  2. Slide the carrier in the direction as illustrated.
5
NOTE
  • Install the nut hex key upwards.

Install the second nut in the ski and snowboard carrier.

  1. Slide the carrier in the direction as illustrated.
  2. Partially remove the rubber holder to gain access.
6

Place the ski and snowboard carrier on the roof cross bar.

7

Secure the ski and snowboard carrier to the roof cross bar.

  1. Slide the carrier in the direction as illustrated.
  2. Thread the nut (J) onto the fixing. 2-3 turns.
  3. Slide the carrier in the direction as illustrated.
  4. Thread the nut (J) onto the fixing. Torque this nut only: 6 Nm
8


  1. Slide the carrier in the direction as illustrated.
  2. Torque: 6 Nm
  3. Install the rubber holder.
9
WARNING
  • Mount the skis with the bindings against the carrier.
  • Make sure the tips of the skis are facing car rearward.

Place skis / snowboards in the carriers.

  1. Slide the carriers in the direction illustrated fully over their bases.
  2. Lock the carriers in position.
  3. Close the carriers.
10

Close and lock the ski and snowboard carriers.

  1. Close with 1 or 2 clicks depending on ski thickness.
  2. Lock by turning the key (D) clockwise.
  3. Remove the key and store in a safe place.
© Land Rover 2016