LAND ROVER ACCESSORY FITTING INSTRUCTIONS

VEHICLE :
PART NO :
KEYWORD :

LAND ROVER

DEFENDER

FRONT UNDERSHIELD

VPLEP0436

FITTING INSTRUCTION

WARNING
  • Accessories which are not correctly installed can be dangerous. Read the instructions carefully prior to ordering and installation to make sure this accessory is applicable to your variant of vehicle. Comply with instructions at all times. If in doubt, contact your nearest approved retailer.
Kits Required Part Number
Front Undershield VPLEP0436

Front Undershield - VPLEP0436 (Bill of Materials)

NOTE
  • The under shield kit may contain additional fixings that are not required during installation. Any additional fixings that are not shown in the image on this installation procedure can be discarded.
Bill Of Materials
(A) Support Bar
(B) Front Undershield
(C) M10x25 Bolt
(D) M10x25 Screw
(E) M10x35 Bolt
REMOVAL INSTRUCTIONS
1

Open hood and remove radiator grille.

  • For additional information, please refer to the official Workshop Manual. Radiator Grille (501-08)
2

Remove front bumper.

  • For additional information, please refer to the official Workshop Manual. Front Bumper (501-19)
3

Remove the x2 brake vents as illustrated. Retain the x4 fixings (S1) that secure the brake vents to the cooling module protector.

  1. Remove the x4 brake vent fixings (S1) and retain.
  2. Remove the x2 brake vents and retain.
4
CAUTION
  • On P6 vehicle variants there is a cooling pipe that must be removed from the cooling module protector.

Release and aside the cooling pipe from the cooling module protector as illustrated.

  1. Release the cooling pipe from the 2 arrowed clips and aside the cooling pipe.
  2. Remove the x2 clips (S2) and retain.
5
CAUTION
  • Carefully move aside the air conditioning pipes on both sides of the cooling module protector to allow access.

Remove the cooling module protector as illustrated.

  1. Remove and retain the x2 cooling module protector M12 bolts (S3).
  2. Remove and discard the x2 cooling module protector bolts as illustrated. Move aside the air conditioning pipes to allow access.
  3. Remove and discard the cooling module protector.
Fitting Instruction
1
NOTE
  • Complete install step 2 to 5 before tightening the x8 armature bolts.

Loosen the x8 armature bolts to assist the installation of the front undershield support bar (A).

2
NOTE
  • This step requires the aid of another technician.

Align and install the front undershield support bar (A).

  1. Align the front undershield support bar with the vehicle.
  2. Align the ends of the front undershield support bar with the brackets as illustrated.
  3. Make sure the holes for the bolts (S3) align with the holes in the subframe. Adjust the armature position to achieve correct hole alignment.
  4. Install, but do not fully tighten the x2 M12 bolts (S3) to secure the front undershield support bar to the vehicle.
3
CAUTION
  • Make sure the air conditioning pipes are positioned correctly on both sides of the front undershield support bar.
NOTE
  • This step requires the aid of another technician.

Secure the ends of the front undershield support bar.

  1. Inspect the alignment of the front undershield support bar with the bracket as illustrated.
  2. Install, but do not fully tighten the x2 bolts (C) to secure the front undershield support bar to the bracket.
  3. Make sure the air conditioning pipes on both sides of the front undershield support bar are installed in the correct location.
4
CAUTION
  • On P6 vehicle variants there is a cooling pipe that must be installed to the front undershield support bar.

Install the clips (S2) and correctly position the cooling pipe.

  1. Install the x2 clips (S2) to the front undershield support bar.
  2. Install the cooling pipe to the 2 arrowed clips and position the cooling pipe as required.
5

Tighten fixings (S3) and (C).

  • Torque: 60Nm
6
CAUTION
  • Tighten the x8 armature fixings that were loosened during install step 1.

Tighten x8 armature fixings.

  • Torque: 55Nm
7

Install the x2 brake vents to the front undershield support bar using the x4 fixings (S1).

8

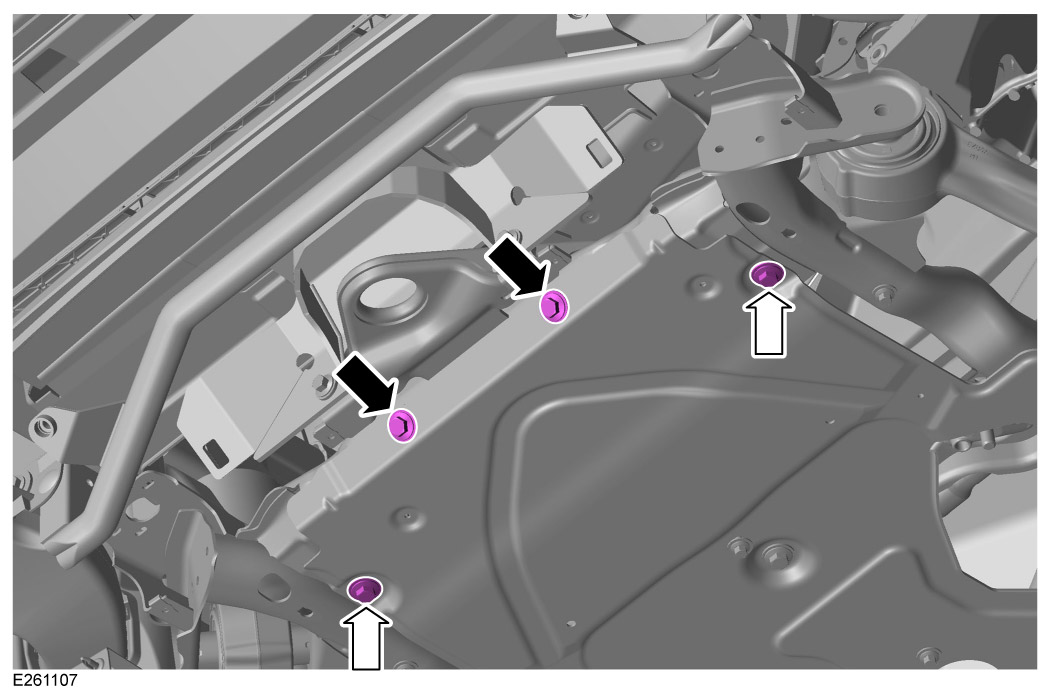
Remove x4 fixings, keeping the x2 highlighted with black arrows and discarding the x2 highlighted with white arrows .

9

Install front bumper.

  • For additional information, please refer to the official Workshop Manual. Front Bumper (501-19)
10

Install radiator grille and then close hood.

  • For additional information, please refer to the official Workshop Manual. Radiator Grille (501-08)
11

Install the front undershield (B) to the front undershield support bar (A).

  1. Align the x2 front undershield hooks with the x2 holes in the front undershield support bar.
  2. Install the x2 front undershield hooks to the x2 holes in the front undershield support bar.
  3. Make sure the front undershield is located correctly.
12

Install, but do not fully tighten x2 fixings that were removed in step 8.

13

Install, but do not fully tighten the x2 fixings (E).

14

Install x2 fixings (D).

  • Torque: 60Nm
15

Tighten x4 fixings.

  • Torque: 60Nm
16

Make sure the front undershield is correctly installed.

© Land Rover 2016