LAND ROVER ACCESSORY FITTING INSTRUCTIONS

VEHICLE :
PART NO :
KEYWORD :

LAND ROVER

DEFENDER

FORK MOUNTED CYCLE CARRIER

VPLWR0101

FITTING INSTRUCTION

WARNING
  • Accessories which are not properly fitted can be dangerous. Read the instructions carefully prior to fitting. When fitting, comply with instructions at all times. If in doubt, contact your nearest approved retailer.
NOTE
  • Right side illustrations shown, left side is similar.
  • The locking system used on this accessory is compatible with the Thule key system. To order replacement keys, refer to your local Thule dealer/website and quote the number stamped into the face of the lock cylinder, e.g - N123. For this accessory, the key model number begins with 1500000***, so for example, the model number for key number N123 would be 1500000123.

Bill Of Materials

Fitting Instruction
1

Determine if the cycle carrier will be mounted on the left side or right side of the vehicle.

  1. If the cycle carrier will be mounted on the left side of the vehicle, start at step 2 then continue to end.
  2. If the cycle carrier will be mounted on the right side of the vehicle, start at step 5 then continue to end.
2
NOTE
  • Left side mounting.


  1. Remove the three parts as illustrated.
  2. Rotate each part 180°.
  3. Replace each part onto the cycle carrier as illustrated.
3

Locate part X onto the bracket for the rear roof cross bar.

4


  1. Loosen the front fork locking handle bolts.
  2. Remove the front fork locking handle from the mount.
  3. Insert the front fork locking handle into the opposite side of the mount.
  4. Tighten the front fork locking handle bolts.
5


  • Attach the front fork mount (G) to the cycle carrier (A).
  • Using the key, unlock the front fork locking handle.
6

Assemble the roof cross bar locking handles (E and F).

7

Assemble the roof cross bar locking handles (E and F) to the cycle carrier.

  • Tighten each roof cross bar locking handle two to three turns.
  • Attach the rear wheel strap to the cycle carrier making sure the orientation is correct and the strap button is not locked.
8

Remove the roof cross bar cover.

9
WARNING
  • Be aware of the vehicle height and seek assistance if required.

Lift the cycle carrier and align with the ends of the roof cross bars.

10
NOTE
  • Make sure the locking handles are in the upright position.


  • Make sure the roof cross bar locking handles are released.
  • Insert the bolts into the roof cross bars.
  • Slide the cycle carrier along the roof cross bars to the required position.
11

Secure the cycle carrier to the roof cross bars.

  1. Rotate the roof cross bar locking handles to tighten.
  2. Push down the handles to secure the cycle carrier to the roof cross bars.
  3. Using the key, lock the front roof cross bar locking handle.
12

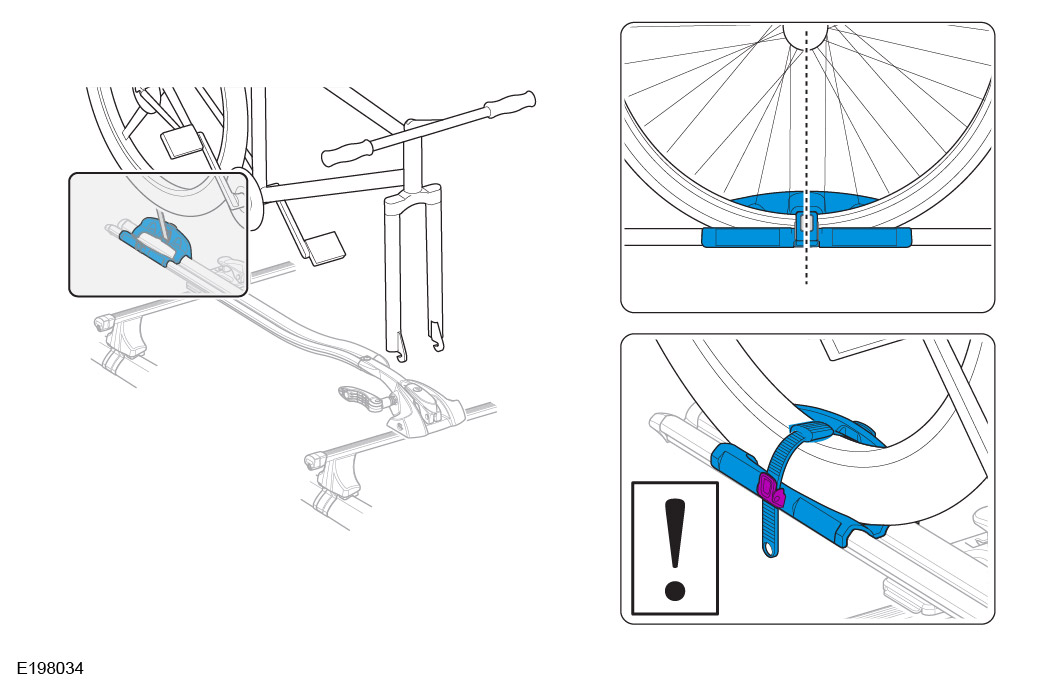
Mounting the cycle onto the cycle carrier.

  1. Using the key, unlock the front fork locking handle.
  2. Release the front fork locking handle.
  3. Lift the cycle onto the cycle carrier, locate the front forks onto the mount and tighten the clamping sleeve.
  4. Engage the front fork locking handle.
  5. Using the key, lock the front fork locking handle.
13

Make sure the rear wheel is placed in the centre of the mount. Tighten the rear wheel strap and then press down the locking button.

14
WARNING
  • Make sure the cycle is securely mounted onto the cycle carrier at both the front and the back.


15

The adapter (H) should be used where the axle diameter is 20 mm.

  1. Loosen the bolts to release the front fork locking handle.
  2. Remove the front fork locking handle from the mount.
  3. Insert the adapter into the mount.
  4. Tighten the bolts to secure the adapter within the mount.
16
CAUTION
  • When a cycle is not attached to the cycle carrier, the clamping sleeve can lose its clamping force. Tightening of the clamping sleeve must always be done when a cycle is attached.


17
NOTE
  • Make sure the fork can be folded up and down.

Assemble the front wheel mounting fork.

18


  1. Remove the roof cross bar cover.
  2. Locate the two bolts into the front roof cross bar then slide along to the position where the front wheel mounting fork will be located.
19


  1. Locate the front wheel mounting fork onto the bolts.
  2. Attach the fasteners onto the bolts.
20
CAUTION
  • Make sure the wheel is secure to the fork mount.

Attach the wheel to the fork.

21

When the cycle carrier is not being used, fold down the front wheel mounting fork.

22
WARNING
  • Do not exceed 130 km/h or 80 mph.


23
WARNING
  • Make sure the cycle is securely mounted onto the cycle carrier at both the front and the back.
  • Weight of fully assembled cycle carrier is 3.2 kg (excluding wheel carrier, 0.8 kg).
  • Maximum cycle weight without front wheel is 17 kg. Maximum wheel weight is 3 kg.
  • Seek assistance if installing a heavy load.
  • Be aware of the extra vehicle height.
  • Make sure the load is secure before starting a journey.
  • Remove the roof cross bars, cycle carrier and the cycle before using an automatic car wash.
  • Adapt your driving technique to suit changes in vehicle handling.

Warnings.

24
NOTE
  • Make a note of the key number for future reference.

Note.

© Land Rover 2016