LAND ROVER ACCESSORY FITTING INSTRUCTIONS

VEHICLE :
PART NO :
KEYWORD :

LAND ROVER

RANGE ROVER SPORT

LOADSPACE PARTITION - FULL HEIGHT

VPLXS0670

FITTING INSTRUCTION

WARNING
  • Accessories which are not correctly installed can be dangerous. Read the instructions carefully prior to ordering and installation to make sure this accessory is applicable to your variant of vehicle. Comply with instructions at all times. If in doubt, contact your nearest approved retailer.
Kits Required Part Number
Loadspace Partition - Full Height VPLXS0670

Warnings / Cautions / Notes

CAUTION
  • If you are installing the 'Loadspace Partition - Full Height' in conjunction with or 'Quilted Loadspace Liner'. Then install the 'Loadspace Partition - Full Height' first. If the 'Quilted loadspace Liner' is already installed these instructions also cover this.
  • Make sure to protect the vehicle paintwork and trim during installation to avoid damage.

Loadspace Partition - Full Height (Bill Of Materials)

NOTE
  • Inspect contents of kit and cut the fixing kit from the loadspace partition. Claims for missing items will not be accepted if the blister pack is opened.
Bill Of Materials
(A) Loadspace Partition - x1
(B) J-Hooks - x2
(B1) Thumb Screws - x2
(C) Upper Pin - x2
(C1) Nut - M8 - x2
(C2) Metal Washer - M8 - x2
(C3) Plastic Washer - M8 - x4
(C4) Domed Plastic Caps - x2

Tooling

Tooling
13mm Socket
17mm Open Spanner
Torque Wrench (24Nm)
Wire Snippers (for cutting cable ties)
Plastic trim removal tool
REMOVAL INSTRUCTIONS
1

Open tailgate and remove parcel shelf.

2
CAUTION
  • If you are installing the 'Loadspace Partition - Full Height' with the 'Quilted Loadspace Liner' already installed then complete steps 3 to 5 first. If not then proceed to step 6.

Quilted Loadspace Liner.

3

Open x2 velcro panels to reveal the D-loops.

4
CAUTION
  • Do not lower the second row seats without first releasing the head restraint straps.

Release all the velcro around the head rests then lower second row seats.

5

Release the seat back panel from both side base panels and rest on second row seats.

6

Fold down second row seats.

7
NOTE
  • Place removed trim covers in secure location so that trim covers can be fitted back when the 'Loadspace Partition - Full Height' is removed.

Remove left and right trim covers without damage using a plastic trim removal tool.

Fitting Instruction
1
NOTE
  • Do not fully tighten to allow pin movement.

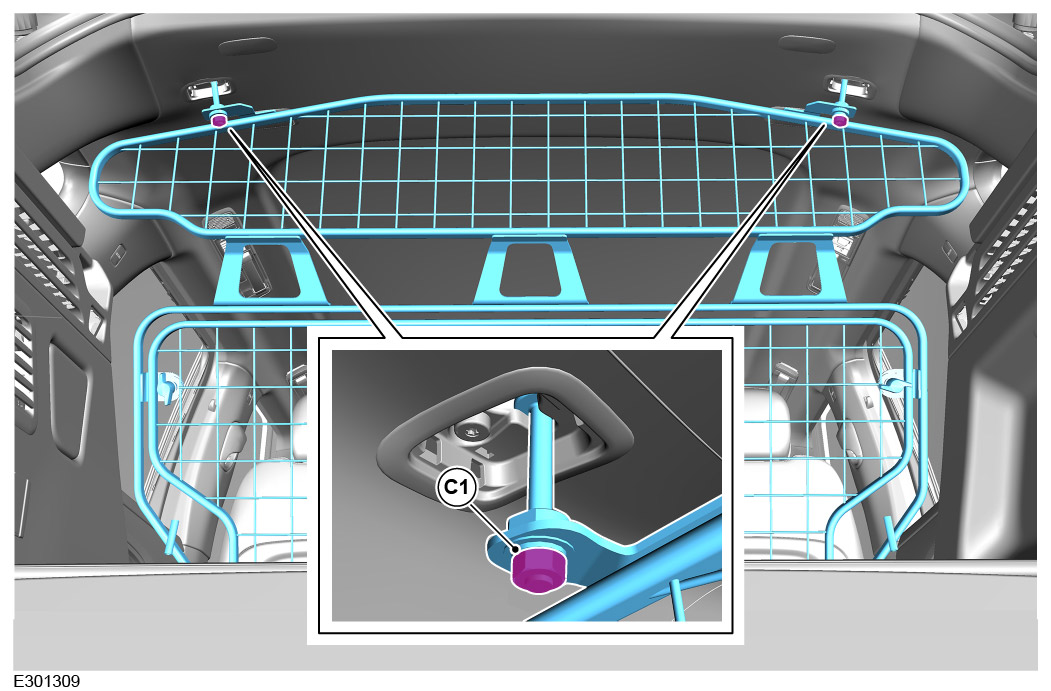
Install x2 upper pins (C) to loadspace partition (A) and secure with washers (C3), (C2) and nut (C1).

2
WARNING
  • Requires the aid of another person.
CAUTION
  • Make sure trim is protected when moving part into vehicle.

Insert loadspace partition (A) into vehicle by the side rear door. Making sure the 'RANGE ROVER' logo is facing to the rear of the vehicle.

3
WARNING
  • Requires the aid of another person.

Insert loadspace partition upper pins (C) into headliner fixing points.

  1. Make sure the loadspace partition pins (C) are first located through the large slots.
  2. Then slide the loadspace partition pins (C) into the smaller slots to install into position.
4

After aligning the loadspace partition to have same clearance on both side of trims, x2 upper mount pin nuts (C1) are tighten on both sides.

  • Torque: 24Nm
5

Install domed plastic caps (C4).

6

Locate D-loops and open.

7
WARNING
  • Requires the aid of another person.
  • Note correct orientation of the J-hooks as illustrated.

Install the J-hooks (C).

  1. Hold the loadspace partition with one hand to make sure it stays engaged with the roof fixing, then swing the loadspace partition slightly forward (towards front of vehicle) to slide the J-hooks (B) through the tension tubes located on the loadspace partition at the bottom on both sides.
  2. Now engage the J-hooks into the D-loops. Correct orientation is shown in the illustration.
8

Install and tighten thumb screws (B1).

9
NOTE
  • This step is 'ONLY' required if you have the 'Quilted loadspace Liner' installed.

Fold in the base panel side rear flaps in preparation for securing the seat back panel.

10
NOTE
  • This step is 'ONLY' required if you have the 'Quilted loadspace Liner' installed.

Raise the seat back panel to secure it with the base side panel with provided velcro.

11
NOTE
  • This step is 'ONLY' required if you have the 'Quilted loadspace Liner' installed.

Raise the second row seats and velcro the elasticated straps on seat back panel around the x3 headrests.

12
NOTE
  • This step is 'ONLY' required if you have the 'Quilted loadspace Liner' installed.

Make sure the back panel of the quilted loadspace liner is behind the full height cargo barrier and not in front of it.

13
CAUTION
  • Make sure the second row seat backrest does not touch the 'Loadspace Partition - Full Height' in the reclined position.

Fold up second row seats if you haven't already done so.

14

Install parcel shelf and close tailgate.

15

The 'Loadspace Partition - Full Height' should be loosened at both the J-hooks. Check the position on roof upper pins and retighten J-hooks for every 300 miles or 500 km.

16
NOTE
  • Make sure all kit contents are stored in a safe place for next use, spares are not available separately from the complete kit.

Removal is the reverse of installation. Install steps 1, 4 and 5 are only required for initial installation to the vehicle.

© Land Rover 2016