LAND ROVER ACCESSORY FITTING INSTRUCTIONS

VEHICLE :
PART NO :
KEYWORD :

LAND ROVER

RANGE ROVER

CROSS BARS

VPLKR0188 / VPLKR0198

FITTING INSTRUCTION

WARNING
  • Accessories which are not correctly installed can be dangerous. Read the instructions carefully prior to ordering and installation to make sure this accessory is applicable to your variant of vehicle. Comply with instructions at all times. If in doubt, contact your nearest approved retailer.
Kits Required Part Number
Cross Bars VPLKR0188
Cross Bar Gap Hiders (included in the Cross Bar Kit) VPLKR0198

Cross Bars (Bill of Materials)

Bill Of Materials Replacement Part Numbers
(A) Keys (x4) See step 13 for replacements
(B) Front Cross Bar n/a
(C) Rear Cross Bar n/a
(D) Cross Bar Finisher Strip (x2) n/a
(E) 8Nm Torque Key n/a
(F) Torque Key Adapter n/a
(G) Gap Hider (x4) VPLKR0198

Cross Bar Brackets

CAUTION
  • 'Cross Bars' can 'ONLY' be installed when the 'Cross Bar Brackets' have already been pre-installed. These 'MUST' be installed by a JLR approved retailer first. See step 2 in these instructions for more information.

Warnings / Cautions / Notes

WARNING
  • The labels on the roof cross bars must be read. The label show the correct cross bar for the front and rear of the vehicle and also the correct orientation of the cross bars.
  • Comply with all the weight limits as illustrated.
  • Do not exceed 130 km/h or 80 mph when the roof cross bars are installed.
  • Do not overload the roof cross bars. Maximum load that can be placed on the roof cross bars is 93 kg or 205 Ibs.
  • Do not load cargo outside the width of the cross bars.
  • Always secure long loads, those significantly exceeding the length of the roof at the end of the vehicle.
  • Always spread the load as evenly as possible on the roof cross bars. With the lowest possible center of gravity.
  • Do not use elastic straps (bungees) to secure loads onto the roof cross bars.
  • Make sure that all cargo are installed securely to the roof bars.
  • Always inspect the cargo is secure after traveling a short distance and thereafter at regular intervals.
  • Adapt your driving technique to suit changes to vehicle handling.
  • Be aware of the extra vehicle height.
  • Negotiate sharp bends with caution and moderate cornering speed.
  • Avoid harsh acceleration and braking.
  • Be aware of the increased effect of wind on the vehicle when carrying items on the roof to minimize the effect of generated lifting and side forces. For example when carrying multiple surf boards, they should be mounted flat and stacked on top of each other.
  • After covering the indicated distances. Inspect the torque of all the roof cross bar fixings. 60 km or 40 miles. Then 250 km or 150 miles. Then every 1000 km or 600 miles thereafter.
  • Seek the assistance of another person when installing the cross bars.
  • Seek the assistance of another person when loading and unloading, heavy, or awkward, items to and from the cross bars.
  • Stand on a secure platform if required to install cross bars and lower the vehicle using the suspension setting.
CAUTION
  • Do not use automatic vehicle wash with cross bars installed.
  • 'Cross Bar Brackets' when installed are not designed to be removed from the vehicle. Should a replacement set be required, these are available separately (VPLKR0195).
NOTE
  • Cross bar gap hiders (G) should always be installed with the cross bars. Failure to fit the gap hiders will result in an increase in wind noise. When the cross bars are not installed, the gap hiders (G) should be removed and stored safely for next use. Should replacements be required, these are available separately, please see bill of materials table for the replacement service part number.
  • Inspect contents of kits to make sure that all the parts are present. Claims will not be paid for blister packs that have been opened prior to reporting missing items.
  • Make sure the keys (A), the tool (E) and a copy of these instructions are kept in a safe place after use. They are required for future removal and installation.
  • Removing the cross bars, when not in use, will improve fuel economy.
  • Obey local regulations regarding carrying items on the roof of a vehicle.
  • To save time complete one side of the vehicle before switching to the other side.

Tooling

Tooling
8Nm Torque Key (comes in kit VPLKR0188 item (E)
Torque Key Adapter (comes in kit VPLKR0188 item (F)
Trim Tool
Scissors
Fitting Instruction
NOTE
  • This procedure contains illustrations for left side components, right side components are similar.
1
CAUTION
  • Make sure trim covers are not damaged during removal.
NOTE
  • Trim covers should be refitted when the cross bars are not installed.

Using a plastic trim tool, insert where shown and remove x4 roof trim covers and store them in a safe place.

2

Check to see if 'Cross Bar Brackets' have already been pre-installed. If not these 'Must' be installed by a JLR approved retailer first.

  • For additional information, please refer to the official Workshop Manual. Cross Bar Brackets (102-06)
3
NOTE
  • Located underneath the gap hiders (G), it will tell the location of where to install them to the vehicle. Note that both front gap hiders are identical.

Install gap hiders (G) onto pre-installed 'Cross Bar Brackets'. Install them with the same orientation as illustrated with the lip (in purple) facing outwards to the sides of the vehicle.

4
CAUTION
  • Damage can occur if not installed correctly.

Inspect the gap hiders are installed correctly to the 'Cross Bar Brackets' as illustrated before installing the cross bars.

5

Open the cross bar side covers.

  1. Using the supplied key (A), unlock the cross bar side covers.
  2. Open covers.
6
CAUTION
  • Make sure to do this off the vehicle to avoid damage.
NOTE
  • Complete this step 'ONLY' when installing the cross bar to the vehicle for the first time.
  • The cross bars are different lengths. After the x2 cross bar finishers have been cut to length they will only install into the cross bar they were cut for. If the cross bar finishers are removed, make sure they are replaced into the correct cross bar and do not cut again.

Install the cross bar finishers (D) into the cross bars (B) and (C) by pushing down along the length of the finisher. Cut the x2 cross bar finishers to the required lengths as illustrated.

7
NOTE
  • Stickers are located underneath the cross bars (B) and (C). When cross bars are installed these labels should be on the left side of the vehicle.

Identify the front (B) and the rear (C) cross bars. Use the label on the cross bars to assist identification. Look for the arrow next to the graphic of the vehicle. The arrow will point at the front or rear cross bar on the vehicle graphic.

8
WARNING
  • The cross bars must be installed into the small cutout as illustrated on both sides. If the cross bars are not installed into the cutout there is a risk the cross bars and any load supported on the cross bars, is not secure.
CAUTION
  • Remove the key (A) from the cross bar cover to prevent damage to the vehicle.
  • Make sure the label is located on the left side of the cross bar when the cross bar is correctly oriented.

Locate and install the front crossbar (B) to the crossbar brackets.

  1. Locate and position the front crossbar over the brackets.
  2. Open the cross bar covers at the ends of the cross bar using supplied key (A) to unlock them if necessary. Remove the key when the cover has been opened.
  3. Insert the cross bar into the cross bar brackets. Make sure the cross bar sits into the two groves (arrowed) for the correct installation. If one end does not fit then adjust the length of the cross bar in step 9.
  4. Hand start tighten the bolt by using the supplied torque key (E) when the cross bars are correctly installed to there brackets.
9
NOTE
  • The rubber strip fitted in installation step 6 will need to be removed to access these fixings. This step is 'ONLY' required when first installing the cross bars to the vehicle. If the same cross bars are used on another vehicle then this adjustment maybe required to make sure the cross bar sits correctly in the grooves on the bracket.

Adjust the crossbar length to the correct position before tightening.

  1. Pull up the end of the cross bar finisher strip what was installed in step 6 to reveal x2 torque head bolts.
  2. Loosen bolts to slide the cross bar end bracket back and forth to your desired length.
  3. When happy with the correct length and both ends of the cross bar install correctly in the cross bar brackets (see step 8). Then tighten the bolt in step 10 first and then use the torque key adapter (E) and (F) to tighten the upper 2x fixings in the illustration above last.
  4. Return the cross bar finisher strip (D) back into its original position.
10

Fully tighten fixing with supplied 8Nm Torque Key (E) on both sides until a click is heard.

  • Torque: 8Nm
11

Fully tighten fixing with supplied 8Nm Torque Key (E) on both sides until a click is heard.

  • Torque: 8Nm
12
CAUTION
  • Do not force otherwise clips may break.

Align the highlighted tabs to the inner moulding then tilt the cover back towards the cross bar to close the cover. Make sure they are correctly installed.

13
NOTE
  • The locking system used on this accessory is compatible with the Thule key system. To order replacement keys, refer to your local Thule Retailer/Authorized Repairer/Website and quote the number stamped into the face of the lock cylinder, example - N123. For this accessory, the key model number begins with 1500000***, so for example, the model number for key number N123 would be 1500000123.

Lock the cross bar covers using the key (A) provided.

14

Repeat steps 5 to 13 to install the rear cross bar (C).

15

Inspect to make sure the cross bars are correctly installed.

16
WARNING
  • Do not exceed 130 km/h or 80 mph when the roof cross bars are installed.

Speed Limit.

17
NOTE
  • This step is 'ONLY' for removal of cross bars.
  • Replacement parts are available should they be misplaced or damaged.

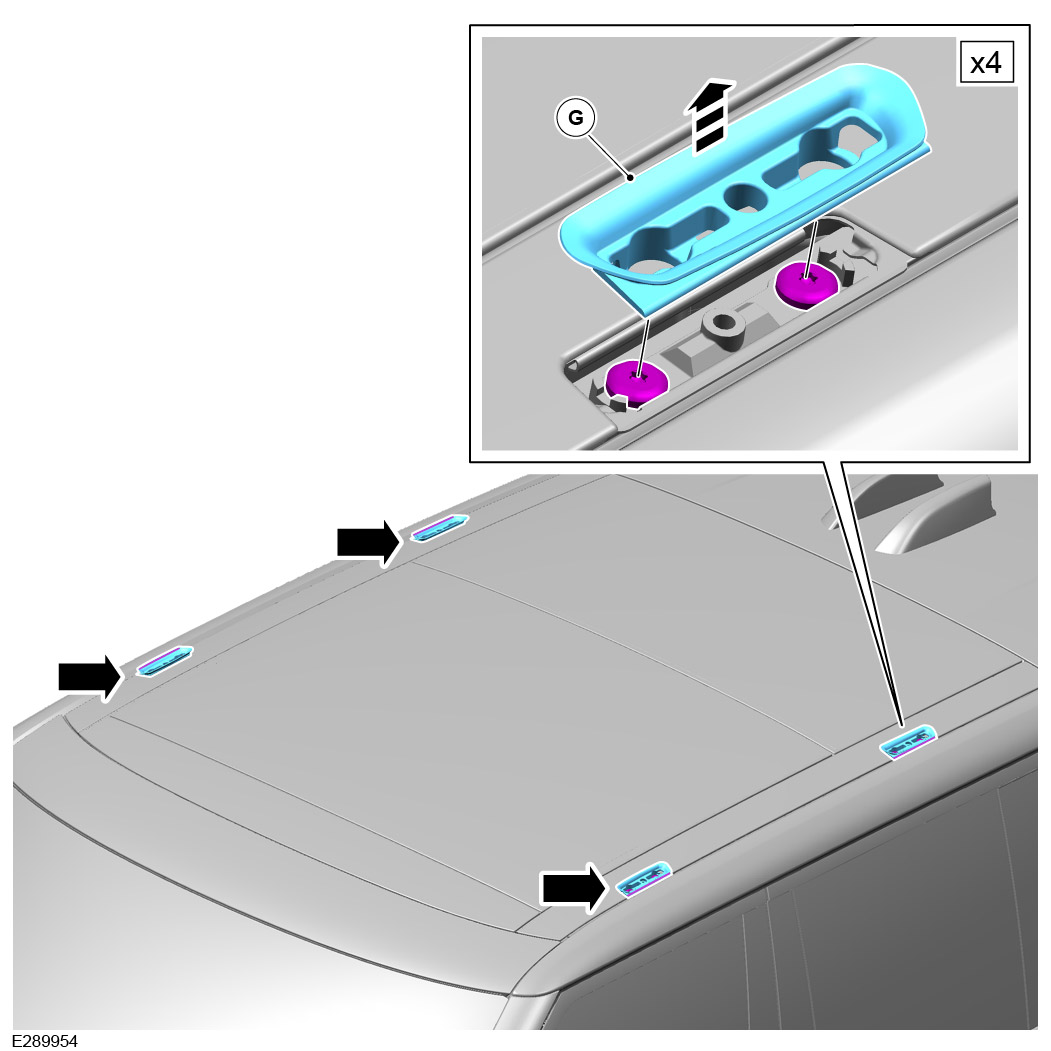
When cross bars have been removed the gap hiders (G) will need to be removed before you can put back on the trim covers. This can just be done by pulling them away from the cross bar brackets under them. When removed store them in a secure location for future use.

© Land Rover 2016