LAND ROVER ACCESSORY FITTING INSTRUCTIONS

VEHICLE :
PART NO :
KEYWORD :

LAND ROVER

RANGE ROVER

SNOW CHAINS

VPLKW0154

FITTING INSTRUCTION

WARNING
  • Accessories which are not correctly installed can be dangerous. Please read the instructions carefully prior to installation. Comply with the instructions at all times. If in doubt, contact your nearest approved retailer.

Snow Chains (Bill of Materials)

WARNING
  • Refer to the Owners Handbook under 'Vehicle Recovery'.
  • Do not exceed 50 km/h or 30 mph when the Snow Chains are installed.
NOTE
  • Items (B), (H), (K) and (L) come preassembled on the snow chains (A).
Fitting Instruction
CAUTION
  • Snow chains must be fitted to the rear left side and the rear right side vehicle tires.
NOTE
  • The following instructions are valid for both sides of the vehicle.
1

Parts shown already come preassembled in the kit.

2
NOTE
  • Do not install the snow chain wheel nut attachment at this point. This step is only to check the correct spacer is used.
  • Make sure there is the correct amount of space between the snow chin wheel nut attachment feature and the wheel as illustrated.

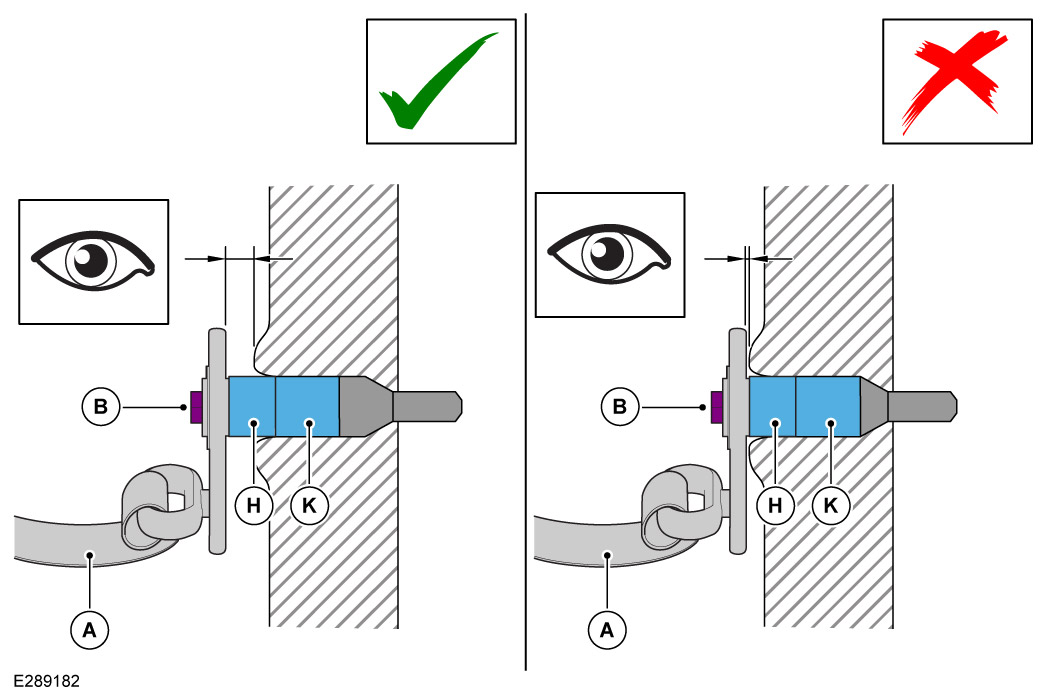
If the snow chain wheel nut attachment feature is correctly located and the small spacer (H) is visible as illustrated, then proceed to step 6. If the snow chain wheel nut attachment feature is not correctly located, then move to next step.

3

Fitting large spacer (J).

  1. Unscrew parts (K) and (L) from fixing (B). And then remove fixing (B) and spacer (H).
  2. Assemble fixing (C) with large spacer (J) then screw back on parts (K) and (L).
4
NOTE
  • Do not install the snow chain wheel nut attachment at this point. This step is only to check the correct spacer is used.
  • Make sure there is the correct amount of space between the snow chin wheel nut attachment feature and the wheel as illustrated.

If the snow chain wheel nut attachment feature is correctly located and the large spacer (J) is visible as illustrated, then proceed to next step.

5

Refer to the list of tires to determine the number of links that should be removed from the snow chains.

6

Remove 3 links from the Snow Chain (A).

  1. Insert tools (E) and (D).
  2. Whist holding tool (D) in a fixed position turn tool (E) anti clockwise to release link nut.
  3. Remove link nut and slide the spring off the snow chain link.
  4. Slide the snow chain link from the yellow spacer to remove.
  5. This is what the snow chain will look like after the link has been removed.
7
NOTE
  • Note position shown of the snow chain (A) when installing.
  • The snow chain at the bottom of the wheel can't be fitted under the wheel. When the vehicle is in motion this part of the snow chain will work its way under the tire to the correct position.

Install the snow chain (A) to the rear wheels.

8

Position the snow chain wheel nut attachment (arrowed) to the correct position on a wheel nut. The snow chain wheel nut attachment should be positioned so it is pointing towards the middle of the wheel.

9

Make sure the sleeve (L) is installed correctly on the wheel nut as illustrated.

10

Tighten fixing using tool (F). Tighten until you hear a click (This is the correct torque).

11

Tighten snow chains.

  1. Crank the pulley back and forth until it is tightened to the correct tension.
  2. You will see a red mark on the strap when tightened to the correct tension.
12

Lock the snow chain clamping handle.

  1. Push snow chain clamping handle down to its original position to lock the strap in place.
  2. Locking position of clamping handle.
REMOVAL INSTRUCTIONS
1

Release snow chains.

  1. Release the snow chain clamping handle.
  2. Push the button.
  3. Move the snow chain clamping handle to the fully back position to release the belt.
2

Release the chains from the tire by pulling toward you.

3

Using tool (F) loosen the bolt that secures the snow chain wheel nut attachment feature to the vehicle wheel nut.

4

Repair any damaged chains or add new chains (G) to increase the size of the snow chain if required.

© Land Rover 2016