LAND ROVER ACCESSORY FITTING INSTRUCTIONS

VEHICLE :
PART NO :
KEYWORD :

LAND ROVER

DEFENDER

EXPEDITION ROOF RACK - 90

VPLER0180 / VPLER0202 / VPLLE0006

FITTING INSTRUCTION

WARNING
  • Accessories which are not correctly installed can be dangerous. Read the instructions carefully prior to ordering and installation to make sure this accessory is applicable to your variant of vehicle. Comply with instructions at all times. If in doubt, contact your nearest approved retailer.
Kits Required Old Part Numbers New Part Number
Expedition Roof Rack - Defender 90 VPLER0180 / VPLER0202 VPLLE0006

Expedition Roof Rack - Defender 90 (Bill of Materials)

Bill Of Materials Replacement Service Part Number
(A) Expedition Roof Rack Available in complete kit only
(B) Fixing - M8x40 Available in complete kit only
(C) Fixing - M8 Available in complete kit only
(D) Spacer Available in complete kit only
(E) Spacer Plate Available in complete kit only
(F) Rack Supports Available in complete kit only
(G) Clamp Plates Available in complete kit only
(H) Roof Rack Caps Available in complete kit only
(I) Roof Rack Finishers Available in complete kit only

Warnings / Cautions / Notes

WARNING
  • Do not exceed 130 km/h or 80 mph when the 'Expedition Roof Rack' is installed.
  • Seek the assistance of another person when installing the heavy 'Expedition Roof Rack'.
  • The handling characteristics of the vehicle will change when a roof load is installed, driving techniques should be altered to suit this changed condition when, for example, braking and cornering.
  • Be aware of the extra vehicle height.
  • Negotiate sharp bends with caution and moderate cornering speeds.
  • Avoid harsh acceleration and braking.
  • After covering the indicated distances (60 km or 40 miles. 250 km or 150 miles), inspect the torque of all the expedition roof rack fixings. Then every 1000 km or 600 miles thereafter.
CAUTION
  • The vehicle must be equipped with 'Roof Rails' if the 'Expedition Roof Rack' is going to be installed.
  • If you are installing a 'Deployable Roof Ladder' in conjunction with the 'Expedition Roof Rack'. Then install the 'Expedition Roof Rack' up to step 10 in these instructions. Then install the 'Deployable Roof Ladder' fully before continuing to step 11.
  • Do not use automated vehicle washes with the 'Expedition Roof Rack' installed.
  • The roof opening panel should not be used when the 'Expedition Roof Rack' is carrying loads that protrude beneath the lower surface of the expedition roof rack cross bars.
  • Objects placed above the roof mounted satellite antenna may reduce the quality of the signal received by the vehicle and could have a detrimental effect on the navigation and satellite radio systems, if installed.
NOTE
  • Obey local regulations regarding carrying on the roof of a vehicle.
  • Removing the 'Expedition Roof Rack', when not in use, will improve fuel economy.
  • It is very important to maintain the equipment in good working order.
  • Keep the instructions in a safe place for future reference.

Weight Limits

WARNING
  • The load must be evenly distributed over the area of the 'Expedition Roof Rack' rack as illustrated. The centre of gravity of the load must be kept as low as possible as illustrated.
  • The maximum load that can be placed on the 'Expedition Roof Rack', is 87 kg or 194 lbs.
  • The maximum load that can be placed on the rear of the 'Expedition Roof Rack' illustrated below in the bottom graphic is 20 kg or 44 lbs.
  • Do not overload the 'Expedition Roof Rack'.
  • Do not exceed the recommended gross vehicle weight (GVW).
  • Do not load cargo, or accessories, outside of the width of the 'Expedition Roof Rack'.
  • Loads that overhang the ends of the 'Expedition Roof Rack' must conform to all relevant local laws and by-laws.
NOTE
  • The weight of the 'Expedition Roof Rack' is 25 kg or 55 lbs.

Securing Cargo

WARNING
  • Seek the assistance of another person when loading and unloading, heavy, or awkward, items to and from the 'Expedition Roof Rack'.
  • Do not tie strap or place heavy load onto the front of the 'Expedition Roof Rack'.
  • Do not use elastic straps (bungees) to secure loads onto the 'Expedition Roof Rack'.
  • All straps that are used must be maintained in a good working order.
  • Make sure that all cargo and accessories are installed securely to the 'Expedition Roof Rack'. Inspect the security of the attachment of the load to the 'Expedition Roof Rack' regularly during the trip.
  • Items that may produce a significant lifting force (for example surfboards) must be mounted in such a way as to minimize this force.
  • Where specialized accessories are available for securing loads (for example cycle carriers or ski carriers), these must be used.
Fitting Instruction
1

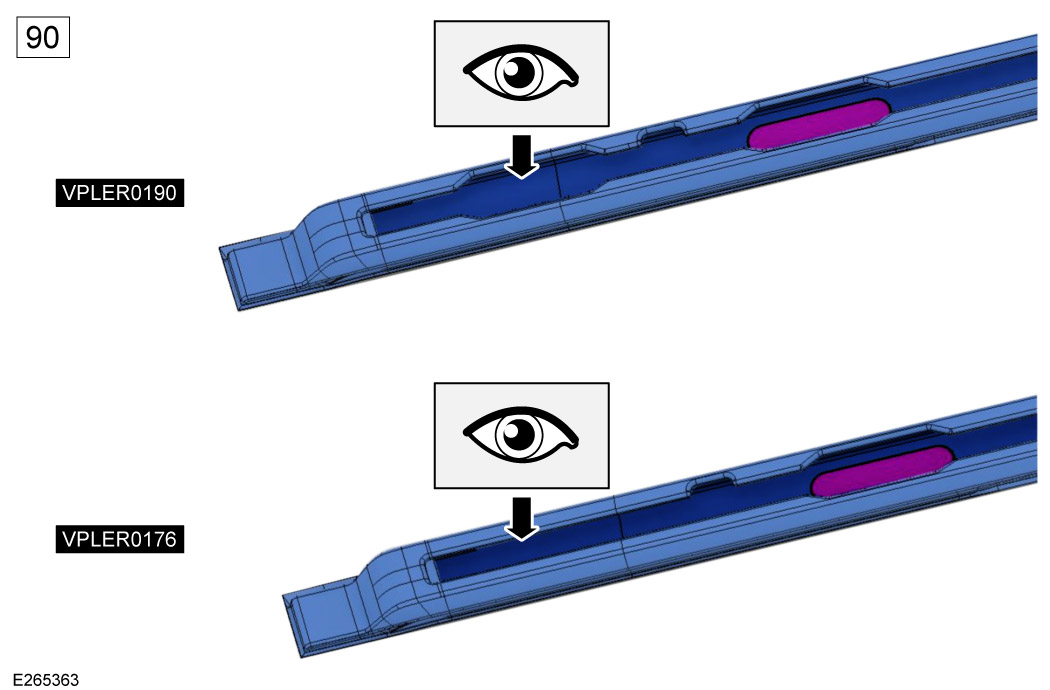
Inspect which type of roof rail you have by comparing with the roof rail illustration above. 'Roof Rails - VPLER0190' has an additional slot at the rear of the roof rail, and is the roof rail of choice to order if you have not yet ordered one.

  1. VPLER0190 - With this roof rail installed you can install the 'Expedition Roof Rack' if a pre-installed 'Deployable Roof Ladder' is already present on the vehicle.
  2. VPLER0176 - With this roof rail installed you will need to first remove the pre-installed 'Deployable Roof Ladder' (if present) before you can start these instructions. However the 'Deployable Roof Ladder' is not intended to be removed when installed and the trim cover - LR175049 or LR166274 on the 'Deployable Roof Ladder' could be damaged when removed. See 'Deployable Roof Ladder' for ordering a new trim cover if required.
2
NOTE
  • 'Roof Rails - VPLER0190' shown. 'Roof Rails - VPLER0176' is similar.

Align and insert the clamp plates (G) into the large cut outs on the roof rail at the x4 locations.

  • If a pre-installed 'Deployable Roof Ladder' is present on 'Roof Rails - VPLER0190'. Then you can install the rear left clamp plate at the location marked (*) instead.
3

Slide the clamp plates (G) into position.

  1. Slide the front clamp plates (G) toward the front of the vehicle along the roof rails, approximately to the location shown.
  2. Slide the rear clamp plates (G) toward the rear of the vehicle along the roof rails, approximately to the location shown. If a pre-installed 'Deployable Roof Ladder' is present on 'Roof Rails - VPLER0190'. Then you will need to slide the rear left clamp plates forward to its location instead.
4

Identify the label on the rack supports (F) to find the location identifier ('FL' = Front Left, 'FR' = Front Right, 'RR' = Rear Right, 'RL' = Rear Left). The rack supports must be installed at the correct location on the vehicle as indicated by the label.

5
CAUTION
  • Make sure the rack supports (F) are installed at the correct location on the vehicle as illustrated. Observe the location identifier on each of the rack supports.

Install the rack supports (F) to the clamp plates.

  1. Place the rack supports (F) onto the clamp plates. Make sure the orientation is correct.
  2. Slide the front rack supports forward until the stoppers on the underneath of the support do not allow further movement.
  3. Slide the rear rack supports backward until the stoppers on the underneath of the support do not allow further movement.
6

Note the bracket stoppers should be up against the roof rail sections.

7

Install, but do not fully tighten the fixings (C) to secure the x4 rack supports (F) to the x4 clamp plates (G).

8
CAUTION
  • Make sure the versatile roof rack finishers are cut to a length so they fill the entire length of the slot in each cross bar. The finisher should install under the longitudinal section of the roof rack on both sides. If gaps remain there will be noise generated as the vehicle is being driven.
NOTE
  • Finisher part numbers: LR171762.

Install the versatile roof rack finishers (I) into each cross bar by pushing down along the length of the finisher. Cut the versatile roof rack finishers to the required length.

9
WARNING
  • This step requires the aid of another person.
CAUTION
  • Take care when lifting the expedition roof rack onto the vehicle to avoid damage to the vehicle paintwork and exterior finishers.

Offer up the expedition roof rack (A) into position.

  1. Offer up the expedition roof rack (A) over the vehicle and place onto the rack supports (F).
  2. Make sure the fixing holes in the expedition roof rack align with the matching holes in the rack supports. Adjust the rack supports if required.
  3. Then remove the expedition roof rack when everything is aligned.
10
NOTE
  • If you are also installing the 'Deployable Roof Ladder', it should be fully installed before proceeding with the remaining 'Expedition Roof Rack' installation steps.

Fully tighten x8 fixings (C).

  • Torque: 30Nm
11
WARNING
  • This step requires the aid of another person.
CAUTION
  • Take care when lifting the 'Expedition Roof Rack' onto the vehicle to avoid damage to the vehicle paintwork and exterior finishers.

Offer up, and align the expedition roof rack (A) back onto the rack supports (F).

12
CAUTION
  • Use duct tape and 'NOT' masking tape.

Before bolting the fixings down on the top of the roof rack, apply Duct tape to the top longitudinal part of the frame on areas above each fixing bracket to avoid scratches to the roof rack.

13

Install the expedition roof rack to the rack supports.

  1. Slide spacer plate (E) into the gap in the rack support.
  2. Hand tighten fixings (B) so they go through the spacer (D), the rail and the rack support and finally engage into the spacer (E).
  3. When happy with alignment, tighten fixings (B). Torque: 32Nm
  4. Remove any duck tape.
14

Install the x2 expedition roof rack caps (H) to the expedition roof rack.

15

Inspect the expedition roof rack is installed correctly.

© Land Rover 2016