LAND ROVER ACCESSORY FITTING INSTRUCTIONS

VEHICLE :
PART NO :
KEYWORD :

LAND ROVER

DEFENDER

WHEEL MOUNTED CYCLE CARRIER 

VPLZR0186, T2H45727

FITTING INSTRUCTION

WARNING
  • Accessories which are not correctly installed can be dangerous. Read the instructions carefully prior to installation. Comply with instructions at all times. If in doubt, contact your nearest approved retailer.
  • Be aware of the extra vehicle height.
  • Make sure the load is secure before starting a journey.
  • Adapt your driving technique to suit changes in vehicle handling.
  • Weight of fully assembled cycle carrier is 4.2 kg.
  • Remove roof cross bars, cycle carrier and cycle when using an automatic car wash.
  • Do not exceed 130 km/h or 80 mph.
  • Comply with maximum frame tube sizes.
  • Make sure the claw is engaged correctly about the cycle frame.
  • Maximum cycle weight is 20 kg.
NOTE
  • This procedure contains some variation in the illustrations depending on the vehicle specification, but the essential information is always correct.
  • Please make sure the keys are safely stored, make a note of the key number for future reference.
  • This procedure contains illustrations showing certain components removed to provide extra clarity.
  • This procedure contains illustrations for left side components, right side components are similar.
  • Appearance of the roof cross bars will vary.
Fitting Instruction
1
NOTE
  • The changes to the cycle carrier, shown in this step, are not required if the cycle carrier will be mounted to the right side of the vehicle

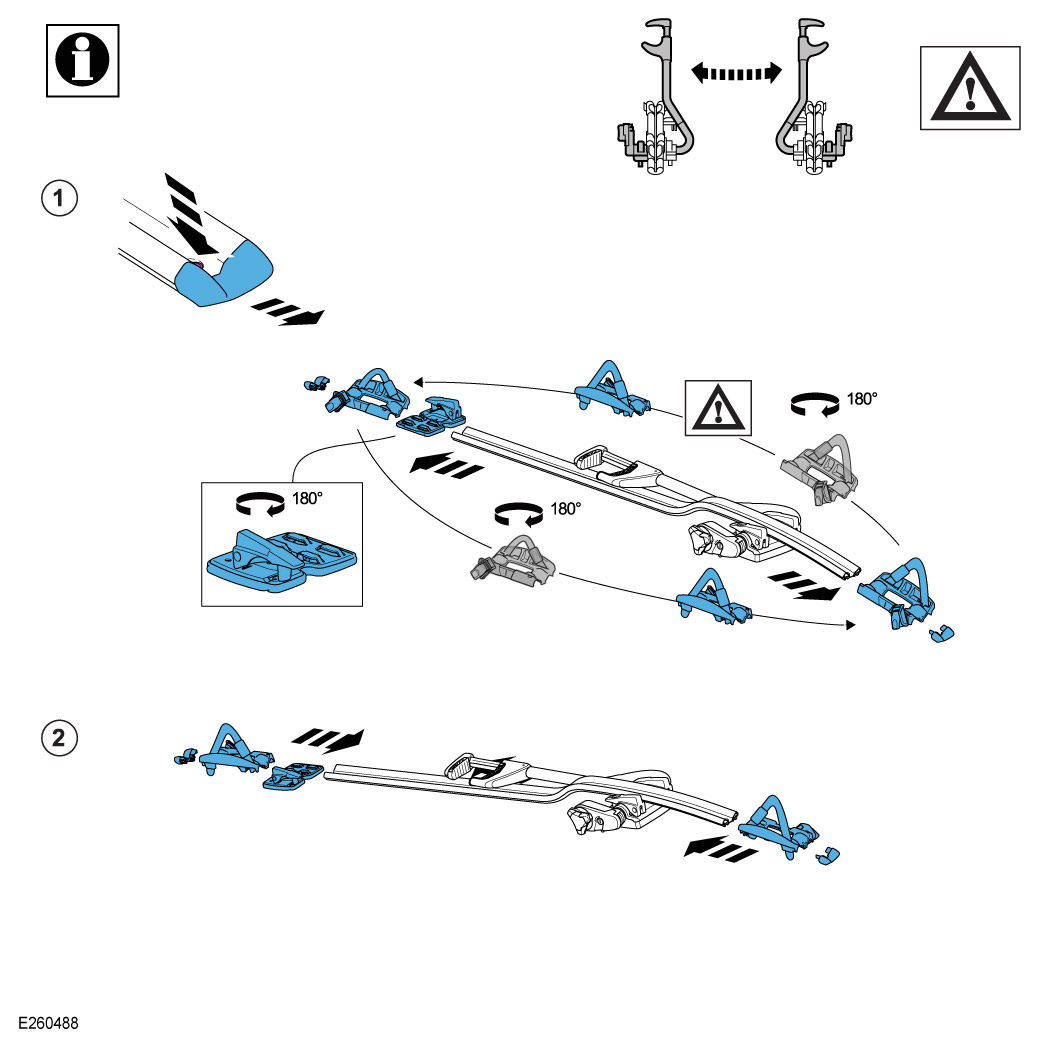
Determine if the cycle carrier will be mounted on the left or the right side of the vehicle. If the cycle carrier will be mounted on the left side of the vehicle then follow steps sub-steps 1 and 2 below and then continue at step 2. If the cycle carrier will be mounted on the right side of the vehicle then go to step 3.

  1. Remove the parts as illustrated. Move and rotate the parts as illustrated.
  2. Replace each part onto the cycle carrier as illustrated.
2
NOTE
  • The changes to the cycle carrier, shown in this step, are not required if the cycle carrier will be mounted to the right side of the vehicle

Rotate the claw and control handle.

  1. Make sure the orientation of the illustrated parts is correct.
  2. Release the fasteners by rotating a quarter turn. Rotate the claw and control handle by 180°. Install the claw and control handle back onto the cycle carrier. Tighten the fasteners by rotating a quarter turn.
3

Use the key to unlock the roof cross bar locking handles. Remove the roof cross bar locking handles from the cycle carrier.

4
NOTE
  • Instructions are for installing a cycle carrier onto T-track type roof cross bars.

Assemble the roof cross bar locking handles (E) and (F) x 2.

5

Assemble the roof cross bar locking handle (F) to the rear cycle carrier bracket.

6

Assemble the roof cross bar locking handles (E) and (F) to the front cycle carrier bracket.

7

Attach the wheel strap buffer (M) onto the wheel strap, as illustrated.

  1. Make sure the strap orientation is correct.
  2. Make sure the strap button is not locked.
8
WARNING
  • Cross bar caps need to be removed prior to installation.
CAUTION
  • Be aware of the vehicle height and seek assistance if required.
NOTE
  • Be aware the rubber insert on the cross bar may need to be removed and cut as required.

Lift the cycle carrier and slide onto the roof cross bars.

9

Slide the cycle carrier to the required position. Rotate the roof cross bar locking handles to tighten and then push down the handles to secure the cycle carrier to the roof cross bars.

  1. Slide the cycle carrier to the required position.
  2. Rotate the roof cross bar locking handles 3 times to tighten.
  3. Push down the roof cross bar locking handles to secure the cycle carrier to the roof cross bars.
10

Using the key, lock the front roof cross bar locking handle.

11

Raise the claw.

12
NOTE
  • This step requires the aid of another person.

Lift the cycle onto the cycle carrier. The cycle frame should engage into the claw.

13
WARNING
  • Use a suitable adapter to avoid damage to the carbon frames.

Make sure the claw is installed to the correct procedure, as illustrated.

14

Turn clockwise the button on the claw control handle until the clicking sound stops.

15

Using the key, lock the claw control handle.

16

Tighten both the front and the rear wheel straps. 

  1. Align the strap bracket with the centre of the wheel.
  2. Pull the strap to secure the bike.
  3. Push and pull the buckle to ratchet the strap tight.
REMOVAL INSTRUCTIONS
1

Release the 2 wheel straps.

2

Using the key, unlock the claw control handle.

3
WARNING
  • Make sure the cycle is being supported as the claw is released.
CAUTION
  • Make sure to protect the vehicle paint and bodywork during the release of the claw and the removal of the bike carrier.

Press the button on the claw control handle to loosen the claw. Lift the cycle clear of the cycle carrier.

4

The cycle carrier can be removed from the vehicle as a single item. Release the locking handles at the front of the cycle carrier.

  1. Using the key, unlock the roof cross bar locking handle. Lift the locking handles and rotate to loosen.
5

Release the locking handle at the rear of the cycle carrier.

6
WARNING
  • Cross bar caps need to be removed prior to removal.

Slide the cycle carrier from the roof of the vehicle.

© Land Rover 2016