LAND ROVER ACCESSORY FITTING INSTRUCTIONS

VEHICLE :
PART NO :
KEYWORD :

LAND ROVER

DEFENDER

BULL BAR

VPLEP0448

FITTING INSTRUCTION

WARNING
  • Accessories which are not correctly installed can be dangerous. Read the instructions carefully prior to installation. Comply with instructions at all times. If in doubt, contact your nearest approved retailer.
Accessories Part Number
Bull Bar Kit VPLEP0448
Black Parking Sensors LR137889
Camera Bracket VPLEB0437
NOTE
  • Fixing (K) is not used in this kit.

Black Parking Sensors (LR137889)

NOTE
  • Black parking sensors LR137889 are required to be ordered for installation.

Camera Bracket (VPLEB0437)

NOTE
  • Only order this kit if vehicle is equipped with front proximity camera.
Fitting Instruction
1
NOTE
  • A bull bar mounting kit (VPLEP0449 / VPLEP0490) must be installed first before the bull bar can be installed.

Install the bull bar mounting kit. For additional information, please refer to the official Workshop Manual. Bull Bar Mounting Kit (102-03)

2

Locate the 2 front inner parking aid sensor electrical connectors.

  1. Parking aid sensor electrical connectors.
  2. If installed, locate the front proximity camera electrical connector.
3

Install the (x2) brackets (D) using (x4) fixings (L) and (M).

  • Torque: 30 Nm
4

For vehicles equipped with a front proximity camera complete steps 5 to 6 and 12 to 13. These steps are not required for vehicles without a front proximity camera.

5

Install the bracket (C) to the bull bar (A) using (x3) fixings (H).

  • Torque: 7 Nm
6

Install the camera bracket (T2) to the bracket (C).

  1. Install the camera bracket (T2) to the bracket (C).
  2. Install (x2) fixings (T1).
  3. Torque: 7 Nm
7
NOTE
  • This step is not required for vehicles with a rivetted front license plate.

Install the (x2) brackets (E) to the bull bar (A) using the (x4) fixings (G) and (J). Then install the (x4) clips (F) to the brackets.

  • Torque: 10 Nm
8

Install the (x2) black parking aid sensors (LR137889) to the parking aid sensor brackets on the bull bar (A).

9

Make sure the 2 front inner parking aid sensor electrical connectors are positioned correctly as illustrated, before the bull bar is installed to the vehicle.

  1. Parking aid sensor electrical connectors.
  2. If installed, check the location of the front proximity camera electrical connector.
10
CAUTION
  • Make sure the parking aid sensor harness does not get trapped. The harness must not be routed against the arrowed surface.
NOTE
  • This step requires the aid of another technician.

Move the bull bar (A) so the bull bar is positioned close to the bull bar mounting cradle. Connect the 2 electrical connectors to the 2 parking aid sensors.

11
NOTE
  • This step requires the aid of another technician.

Install the bull bar (A) to the bull bar mounting cradle using (x2) fixings (N).

  • Torque: 110 Nm
12
CAUTION
  • Take care when handling the front proximity camera. Avoid touching the camera lens.
NOTE
  • For vehicles with a front proximity camera order (VPLEB0437).
  • Make sure the proximity camera is in the correct orientation when installing into the housing.

Carefully install the front proximity camera (S2) into the camera housing (T3).

13
CAUTION
  • Take care when handling the front proximity camera. Avoid touching the camera lens.
NOTE
  • For vehicles with a front proximity camera.

Install the camera housing (T3) to the camera bracket (T2).

  • Secure the camera housing to the camera bracket using the fixing (T1). Torque: 7 Nm
14
NOTE
  • Part (Q) is part of the bull bar mounting kit (VPLEP0449 / VPLEP0490).

Install the winch guide plate (Q) with (x2) fixings (L2) from (VPLEP0449) or (x2) fixings (SS2) from (VPLEP0490). If winch is fitted feed the winch rope through the winch guide plate.

  • Torque: 30 Nm
15

Install (x2) fixings (M).

  • Torque: 30 Nm
16

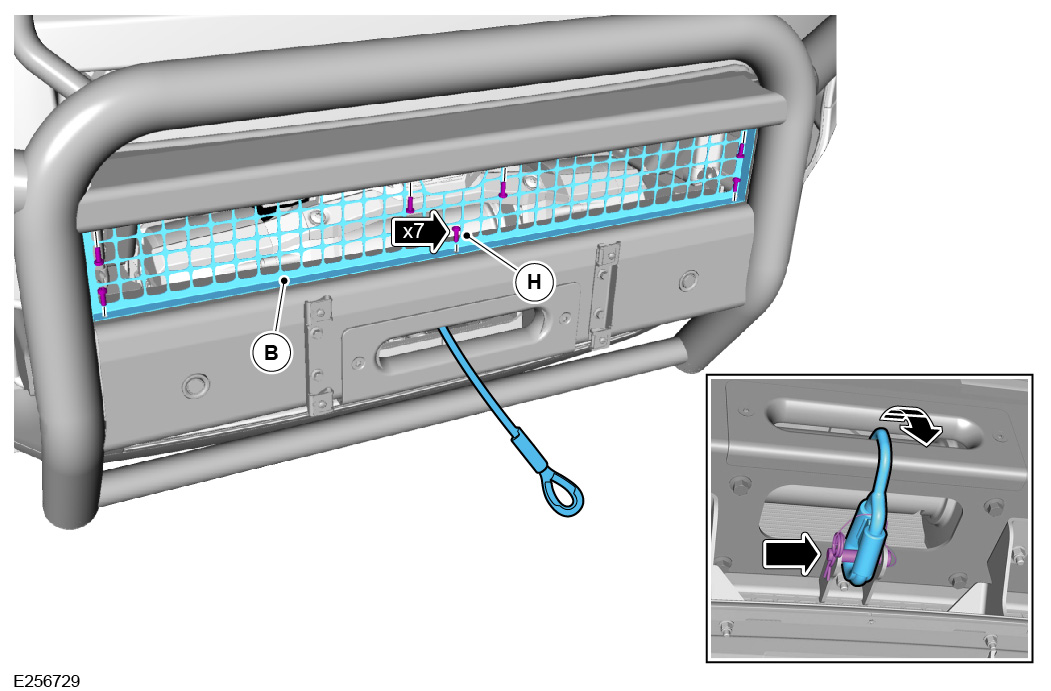
Install the grill (B) using (x7) fixings (H). If winch is fitted, attach the winch rope using the Pin and Clip (T) from Remote Electric Winch Kit VPLEP0426 to the bracket on the underside of the cradle making sure there is no slack in the rope.

  • Torque: 7 Nm
17
NOTE
  • It is required by law in some markets to rivet the license plate to the vehicle.

Install the license plate using the quarter turn screw and washer provided. Alternatively if the market requires, rivet the license plate in the position shown.

18

Check to confirm the parking sensors and front proximity camera are working correctly. Check that the camera image is displayed in the correct orientation on the touchscreen.

© Land Rover 2016