LAND ROVER ACCESSORY FITTING INSTRUCTIONS

VEHICLE :
PART NO :
KEYWORD :

LAND ROVER

DEFENDER

TOWBAR MOUNTED CYCLE CARRIER

VPLER0174 / VPLER0201 / VPLER0175

FITTING INSTRUCTION

WARNING
  • Accessories which are not correctly installed can be dangerous. Read the instructions carefully prior to ordering and installation to make sure this accessory is applicable to your variant of vehicle. Comply with instructions at all times. If in doubt, contact your nearest approved retailer.
Kits Required Part Number Superseded by
Towbar Mounted Cycle Carrier VPLER0174 VPLER0201
Straight Cycle Arm Mount (for 3 cycles only) VPLER0175

Warnings / Cautions / Notes

WARNING
  • Adapt your driving technique to suit changes in vehicle handling.
  • Be aware of the extra vehicle length when the towbar mounted cycle carrier is mounted.
  • Maximum permitted load capacity for towbar mounted cycle carrier - 2 cycle is 40 kg. Refer to the owner's handbook for information on towbar specific maximum permitted vertical load capacity.
  • Maximum permitted load capacity for towbar mounted cycle carrier - 3 cycle is 51 kg. Refer to the owner's handbook for information on towbar specific maximum permitted vertical load capacity.
  • Maximum individual bicycle weight is 20 kg. Refer to the owner's handbook for information on vehicle specific maximum bicycle weight.
  • Seek assistance if fitting a heavy load.
  • Make sure the load is secure before starting a trip.
  • Inspect that the towbar mounted cycle carrier is securely installed after driving a short distance (50 km or 30 miles) and thereafter at regular intervals.
  • Weight of fully assembled towbar mounted cycle carrier is 18.1 kg.
  • Do not exceed 130 km/h (80 mph).
CAUTION
  • The vehicle specific towbar capacity must be checked in the owner's handbook.
NOTE
  • The towbar mounted cycle carrier can be used if the spare wheel is installed to the vehicle. The towbar mounted cycle carrier can carry 2 cycles. If the spare wheel is not installed then a straight cycle arm mount (VPLER0175) can be installed to the towbar mounted cycle carrier which will allow 3 cycles to be carried.
  • If the towbar mounted cycle carrier is installed at the same time as the multiheight drop plate towbar then the multiheight drop plate towbar can only be used in the middle or the lower position.
  • The straight cycle arm mount (VPLER0175) is not included in the towbar mounted cycle carrier kit (VPLER0174 / VPLER0201). This part must be ordered separately if required. The assembly of the straight cycle arm mount to the cycle carrier is the same process as for the cycle arm mount.
  • A license plate must be installed to the towbar mounted cycle carrier when the cycle carrier is being used.
  • Keep the instructions and (if applicable) the type approval certificate (ECE) in the vehicle.
  • Not recommended for tow ball made of GGG 40, cast iron or Aluminum (tow ball and 2 cm below the tow ball need to be made out of steel, rest is okay to be aluminum).
  • All components of the towbar mounted cycle carrier are fully recyclable and can be handed over to an appropriate collection point for recycling. Lamps must be properly disposed of as electrical scrap.

Towbar Mounted Cycle Carrier (Bill of Materials)

Data table Specifications
Towbar Mounted Cycle Carrier - 2 cycle (VPLER0174 / VPLER0201)
Maximum cycle carrier capacity 40 kg
Maximum individual bicycle weight 20 kg
Towbar Mounted Cycle Carrier - 3 cycle (VPLER0174 / VPLER0201 with VPLER0175 installed)
Maximum cycle carrier capacity 51 kg
Maximum individual bicycle weight 20 kg
Fitting Instruction
1
NOTE
  • The straight cycle arm mount (VPLER0175) is not included in the towbar mounted cycle carrier kit ((VPLER0174 / VPLER0201). This part must be ordered separately if required.

Complete steps 2 and 3 only if the straight cycle arm mount (C) from (VPLER0175) is being installed to replace the cycle arm mount (B).

  • If the straight cycle arm mount (C) is not being used then start at step 4.
2
NOTE
  • Complete step only if the straight cycle arm mount (VPLER0175) is being installed to replace the cycle arm mount (B).

Add the lock (H) to the additional cycle arm (D) that comes in the straight cycle arm mount kit (VPLER0175).

  1. Insert the key (K) into the lock (H).
  2. Insert the lock (H) into the cycle arm (D).
3
NOTE
  • Complete step only if the straight cycle arm mount (VPLER0175) is being installed to replace the cycle arm mount (B).
  • The cycle arms can be installed in any order along the top of the straight cycle arm mount.

Remove the 2 cycle arms (D) from the cycle arm mount (B) and install the cycle arms to the straight cycle arm mount (C).

  1. Loosen the thumbscrew to open the clamp as wide as possible on the 2 cycle arms (D).
  2. Remove the 2 cycle arms (D) from the cycle arm mount (B).
  3. Thread the first cycle arm onto the straight cycle arm mount (C) as illustrated.
  4. Move the cycle arm along the cycle arm mount until the required position is achieved.
  5. Do not tighten the thumbscrew on the cycle arms at this stage.
  6. Repeat above steps for the second cycle arm. This can be installed from the other leg of the straight cycle arm mount if required.
  7. Install the third cycle arm from the straight cycle arm mount kit (VPLER0175) if required.
4
NOTE
  • If the straight cycle arm mount (VPLER0175) will be installed then complete step using the straight cycle arm mount (C) instead of the cycle arm mount (B).
  • The straight cycle arm mount kit (VPLER0175) also includes spares of the fixings (E) and (F).
  • This illustration shows certain components removed to provide extra clarity.

Install the cycle arm mount to the cycle carrier.

  1. Install the cycle arm mount (B) as illustrated.
  2. Install the fixings (E) and (F).
  3. Install the 2 quick release handles (G) by rotating into position on the bolts (E). Pull the quick release handles upright to lock.
  4. Inspect the 2 quick release handles are correctly installed as illustrated.
  5. Make sure the fixing holes in the cycle arm mount align with the fixing holes in the cycle carrier frame.
5
NOTE
  • This illustration shows certain components removed to provide extra clarity.

Fold down the cycle arm mount (B) or (C).

  • Loosen the 2 quick release handles to allow the cycle arm mount to be folded down.
6

Release the cycle carrier locking handle.

  1. Using the key, unlock the cycle carrier locking handle.
  2. Push in the release switch.
  3. With the release switch still held in, move the cycle carrier locking handle to the upright position.
7
CAUTION
  • The tow ball must be cleaned before the cycle carrier is installed.
NOTE
  • Not recommended for tow balls made of GGG 40, cast iron or Aluminum (tow ball and 2 cm below the tow ball needs to be made out of steel, rest is okay to be aluminum).


8

Open the tailgate.

9
CAUTION
  • Make sure to protect the vehicle paintwork.
  • Keep the cycle carrier supported at all times during the installation.

Install the cycle carrier to the vehicle tow ball by following the steps below.

  1. Without needing the release lever held in, move the cycle carrier locking handle to about 40°. This will open the arrowed mechanism that clamps onto the tow ball.
  2. Lift the cycle carrier onto the vehicle tow ball. Make sure the cycle carrier is tilted towards the vehicle as illustrated.
  3. Without needing the release lever held in, push the cycle carrier locking handle as far as you can towards the vehicle so it moves to an upright position. Make sure the arrowed mechanism engages over the tow ball. Make sure the cycle carrier remains tilted towards the vehicle.
  4. Lower the rear of the cycle carrier so the cycle carrier is now horizontal. Keep supporting the cycle carrier at all times.
10
CAUTION
  • Keep the cycle carrier supported until you are sure the cycle carrier is correctly installed.

Inspect the installation of the cycle carrier to the tow ball.

  1. Use the coupling indicator to make sure the cycle carrier is correctly installed. The coupling indicator must indicate green.
  2. Make sure the cycle carrier is aligned parallel with the rear of the vehicle.
11
WARNING
  • The cycle carrier locking handle must be fully engaged to make sure the cycle carrier is correctly attached to the tow ball.
  • After completing this step make sure the cycle carrier is unable to be moved when force is applied to it.

Secure the cycle carrier to the tow ball and make sure the cycle carrier is secure.

  1. Push in the release lever.
  2. While keeping the release lever pushed in, pull down the cycle carrier locking handle until resistance is felt.
  3. Release the lever.
  4. Without needing the release lever held in, pull down the cycle carrier locking handle to the next locking position. An audible click will be heard as the handle reaches the locking position.
  5. Turn the key to lock the cycle carrier locking handle.
  6. If the key does not turn then push the cycle carrier locking handle down until it reaches the next locking position. Try turning the key again and repeat as required.
  7. Make sure the cycle carrier is correctly aligned with the vehicle it is installed to.
  8. Apply force to the cycle carrier to make sure the cycle carrier is correctly installed to the tow ball.
  9. If the cycle carrier is not correctly attached to the tow ball then unlock the cycle carrier locking handle. Keep pushing down on the cycle carrier locking handle until an audible click is heard and a locking position is reached. Lock the cycle carrier locking handle and then test the cycle carrier again to make sure the cycle carrier is correctly attached to the tow ball.
12

Close the tailgate.

13

Raise up the cycle arm mount (B) or (C).

  1. Make sure the cycle arm mount is located correctly in the arrowed slots.
  2. Tighten the 2 quick release handles to secure the cycle arm mount.
14

To install the license plate complete steps 15 to 17.

15

Prepare the license plate plinth.

  1. Remove the illustrated fixing clip from the license plate plinth by twisting. Retain the fixing clip.
  2. Push down the 2 tabs to allow the license plate to be installed.
16

Install the license plate to the license plate plinth on the cycle carrier.

  1. Slide the license plate into the license plate plinth. Make sure the license plate is located under the top edge of the license plate plinth.
  2. Make sure the license plate is flush against the license plate plinth as illustrated.
17

Secure the license plate to the license plate plinth.

  1. Push up the 2 tabs to secure the license plate in the correct position.
  2. Install the fixing clip at the illustrated position.
18
NOTE
  • The reverse lamp on the cycle carrier tail lamp assembly will not operate on vehicles with 12N/12S type towing electrics using a 7-pin to 13-pin adapter.

Cycle carrier tail lamp connection.

  • Engage the electrical connector for the cycle carrier tail lamp assembly into the connector on the vehicle as illustrated.
19
CAUTION
  • When not being used make sure the electrical connector is stored securely.

When not being used make sure the electrical connector is stored securely using the clip as illustrated.

20

Release the wheel straps.

  1. Press down on the wheel strap locking switch.
  2. Release the wheel strap through the wheel strap handle.
21
CAUTION
  • Do not fully undo the thumbscrews on the extendable wheel holder.

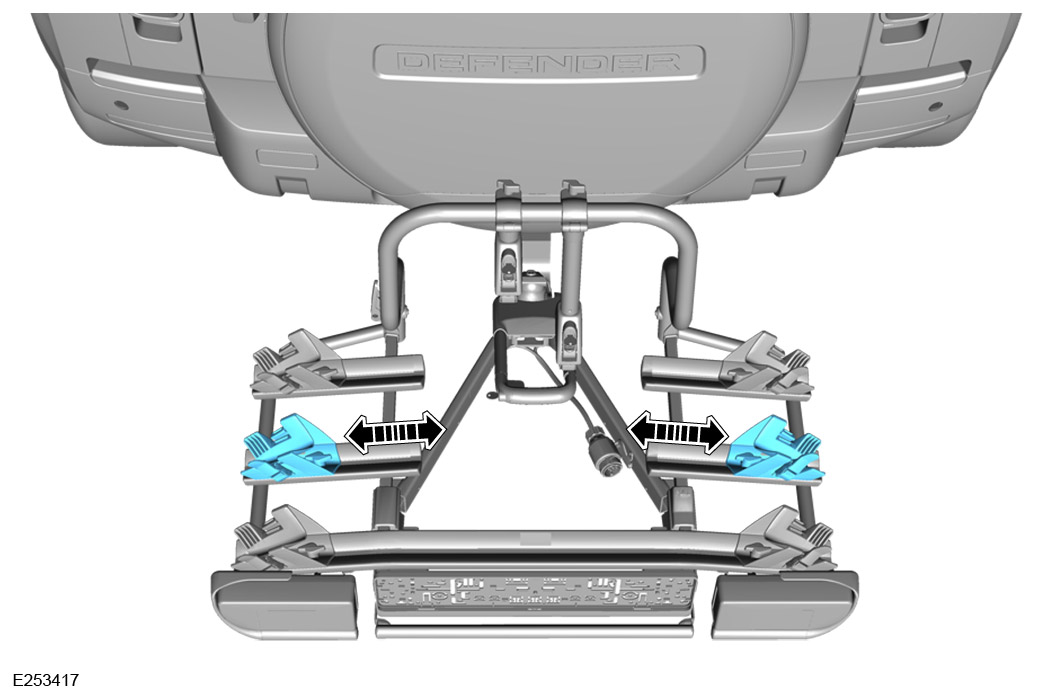
Adjust the extendable wheel holders to match the size of the cycle being transported. Make sure the cycle wheels do not overhang the cycle carrier wheel holders.

  1. Loosen the thumbscrews a few turns on the extendable wheel holder.
  2. Adjust the position of the extendable wheel holder.
  3. Tighten the thumbscrews on the extendable wheel holder.
22

Placement of cycles onto the cycle carrier.

  • When placing the cycles onto the cycle carrier, make sure the heaviest cycle is nearest the vehicle.
  • Cycles should face in the opposite direction to each other.
23

Lift the cycle onto the cycle carrier.

24
CAUTION
  • If required, rotate the cycle handlebars by 90° to avoid damage to the vehicle.


25

Move the cycle arm over the frame of the cycle. Wrap the strap at the end of the cycle arm around the frame of the cycle and adjust as required.

26

Place the wheel strap over the cycle wheel and then through the wheel strap handle. Repeatedly lift the wheel strap handle up and down to tighten the wheel strap about the cycle wheel.

27

Tighten the thumbscrew on the cycle arm to secure the cycle arm to the cycle arm mount.

28

Using the key (K), lock the cycle arm.

29

Adjust the two movable units on the cycle carrier tail lamp assembly so that each unit is aligned with the tail lamp assembly on the vehicle.

  • Loosen the illustrated screws to allow the movable units to slide along the rail.
30
WARNING
  • Make sure the cycle carrier tail lamp assembly is operating correctly.


31

Replace the bulbs as required.

  1. P 21/5 Watt
  2. PY 21 Watt
  3. P 21 Watt
  4. P 21 Watt
  5. C 5 Watt
32

GB Technical Specification

  • Weight of fully assembled towbar mounted cycle carrier is 18.1 kg.
  • Maximum permitted load capacity for towbar mounted cycle carrier - 2 cycle is 40 kg. Refer to the owner's handbook for information on towbar specific maximum permitted vertical load capacity.
  • Maximum permitted load capacity for towbar mounted cycle carrier - 3 cycle is 51 kg. Refer to the owner's handbook for information on towbar specific maximum permitted vertical load capacity.
  • Maximum individual bicycle weight is 20 kg. Refer to the owner's handbook for information on vehicle specific maximum bicycle weight.
  • Safety instructions for checking before and during travel.
  • The vehicle driver is solely responsible for making sure that the product is in faultless condition and that the cycle carrier load is securely fastened.
  • Never exceed the permitted vertical tow ball capacity of the vehicle. The combined weight of the cycle carrier and the load must never exceed the permitted vertical tow ball capacity. The information on the vehicle's vertical tow ball capacity can be found in the vehicle information booklet or next to the towbar on a information panel.
  • The maximum weight per bicycle is 20 kg. Always position the biggest/heaviest bicycle first and closest to the vehicle and then position the smaller/lighter bicycle.
  • The cycle carrier shall be assembled and installed securely in accordance with the instructions.
  • Before starting a trip, the function of the tail lamp assembly must be checked. When using the fog lamp on the cycle carrier, make sure the fog lamp on the vehicle is not working at the same time.
  • Before starting a trip, all loose parts must be taken off the cycles being transported. This could be, for example, child seats, baskets, locks and cycle pumps. The cycles must not contain loose items that could cause danger to others.
  • If the vehicle is equipped with a power tailgate, this function must be disabled. The luggage compartment must be opened manually when the cycle carrier is installed to avoid damage to the cycle carrier and/or vehicle.
  • Inspect that straps and other fasteners are secure, tighten if necessary.
  • The vehicle's total length increases when the cycle carrier is attached. The cycles themselves may increase the vehicle's total width and height. Take care when reversing and/or entering garages or ferries for example.
  • Replace any damaged or worn parts immediately. During use, all levers, bolts or nuts must be tightened (according to instructions). The cycle arms must always be locked during transport.
  • The cycle carrier must always be locked during transport. Keep the keys in a safe place.
  • When the cycle carrier is installed the vehicle's on road behavior may change, especially when taking curves and during braking.
  • Applicable speed limits and other traffic regulations must always be followed.
  • Speed should always be tailored to suit safety considerations with regard to traffic conditions and the load being carried. Maximum speed is 130 km/h (80 mph).
  • The cycle carrier is constructed to carry standard bike frames. Tandem cycles may not be carried.
  • Jaguar Land Rover absolves itself of responsibility for any personal injuries or consequential damage to property or wealth caused by incorrect fitting or use.
  • Modifications to this product are not permitted.
  • Clean the cycle carrier regularly using warm water or vehicle shampoo. Make sure the cycle carrier is cleaned when using at coastal locations (salt water) or during times when salt is used on the roads (winter).
  • For vehicle first type-approved after 1 October 1998, the installed cycle carrier or the transported goods are not allowed to hide the vehicle's third stop lamp. The vehicle's third stop lamp shall be visible as follows. If these stipulations are not met, a replacement stop lamp shall be installed.
    1. From the left and the right sides as follows: Relative to the vehicle's longitudinal axis - at a 10° horizontal angle.
    2. Upwards: Relative to the upper edge of the lamp - at a 10° vertical angle.
    3. Downward: Relative to the lower edge of the lamp - at a 5° vertical angle.
  • Lubricate the coupling mechanism (not the tow ball contact area) or other moving parts when required.
  • Inspect that the tow ball is clean from dirt and oil and not damaged.
  • Keep a safe distance between the cycle carrier and cycles mounted upon it and the exhaust system to avoid heat damage to the cycle carrier and/or cycles.
  • Should the cycle carrier move on the towbar, or the clamping force is lost in the handle-fixation, the clamping force around the tow ball must be applied again according to the installation instructions. Alternatively ask your local Jaguar Land Rover retailer for assistance.
  • If projecting more than 40 cm beyond the outer edge of the lamp emitting surfaces of the clearance or rear lamps of the luggage rack, the load shall be provided, if necessary, to the front with a white lamp at the side not more than 40 cm from its edge and not more than 1.5 metres above the lane. A red lamp shall be visible towards the rear.
  • Inspect that the cycle carrier is securely installed after driving a short distance (50 km or 30 miles) and thereafter at regular intervals.
  • When not in use, the product should be removed from the vehicle.
  • Keep the instructions and (if applicable) the type approval certificate (ECE) in the vehicle.
  • All components of the towbar mounted cycle carrier are fully recyclable and can be handed over to an appropriate collection point for recycling. Lamps must be properly disposed of as electrical scrap.
© Land Rover 2016