LAND ROVER ACCESSORY FITTING INSTRUCTIONS

VEHICLE :
PART NO :
KEYWORD :

LAND ROVER

DEFENDER

CHEQUERED BODY PROTECTION KIT

VPLEP0419 - VPLEP0536 / VPLEP0383 / VPLEP0384 / VPLEP0510 / LR176383 / VPLEP0545

FITTING INSTRUCTION

WARNING
  • Accessories which are not correctly installed can be dangerous. Read the instructions carefully prior to ordering and installation to make sure this accessory is applicable to your variant of vehicle. Comply with instructions at all times. If in doubt, contact your nearest approved retailer.
Kits Required Part Number Superseded By
Chequered Side Body Protection - Defender 90 VPLEP0383
Chequered Side Body Protection - Defender 110 / 130 VPLEP0384
Chequered Body Protection - Defender 90 / 110 VPLEP0419 VPLEP0536
Chequered Body Protection - Defender 130 VPLEP0510
Antenna Bracket - Defender 90 / 110 LR176383
Chequered Rear Scuff Plate - Defender 90 / 110 / 130 VPLEP0545

Chequered Body Protection - Defender 90 (Bill of Materials)

NOTE
  • Order kits VPLEP0383 and VPLEP0419 or VPLEP0536 if installing the 'Chequered Body Protection' to Defender 90 vehicles that are 'NOT' equipped with the 'Wheel Arch Protection' accessory. Only order kits VPLEP0419 or VPLEP0536 if the vehicle is already equipped with the 'Wheel Arch Protection' accessory.
  • The rear scuff chequer plate (E) should 'NOT' be installed if the vehicle is equipped with the 'Rear Scuff Plate - VPLEP0447'.

Chequered Body Protection - Defender 110 (Bill of Materials)

NOTE
  • Order kits VPLEP0384 and VPLEP0419 or VPLEP0536 if installing the 'Chequered Body Protection' to Defender 110 vehicles that are 'NOT' equipped with the 'Wheel Arch Protection' accessory. Only order kits VPLEP0419 or VPLEP0536 if the vehicle is already equipped with the 'Wheel Arch Protection' accessory.
  • The rear scuff chequer plate (E) should 'NOT' be installed if the vehicle is equipped with the 'Rear Scuff Plate - VPLEP0447'.

Chequered Body Protection - Defender 130 (Bill of Materials)

NOTE
  • Order kits VPLEP0384 and VPLEP0510 if installing the 'Chequered Body Protection' to Defender 130 vehicles that are 'NOT' equipped with the 'Wheel Arch Protection' accessory. Only order kit VPLEP0510 if the vehicle is already equipped with the 'Wheel Arch Protection' accessory.
  • The rear scuff chequer plate (E) should 'NOT' be installed if the vehicle is equipped with the 'Rear Scuff Plate - VPLEP0447'.

Antenna Bracket - LR176383

NOTE
  • Order LR176383 if the vehicle is equipped with cellular booster.

Chequered Rear Scuff Plate - VPLEP0545

NOTE
  • 'ONLY' order this kit if you are only installing the 'Rear Scuff Plate' to the vehicle.
  • For installation of this kit jump to step 28 and proceed from there.

Warnings / Cautions / Notes

CAUTION
  • If the illustrated 'Wheel Arch Protection' accessory (see graphic below) is installed then kits VPLEP0383 or VPLEP0384 can 'NOT' be installed. Only order VPLEP0419, VPLEP0536 or VPLEP0510.
CAUTION
  • If protective wax has been applied to the vehicle it must be thoroughly removed before starting this procedure.
  • The vehicle must be clean, dry and at workshop temperature. Vehicles moved into the workshop from cold or wet conditions should be dried and left to stand for a minimum of 2 hours. Use JLR-60051001 infa-red thermometer to check panel temperature.
NOTE
  • This procedure contains illustrations for left side components, right side components are similar.
Fitting Instruction
1

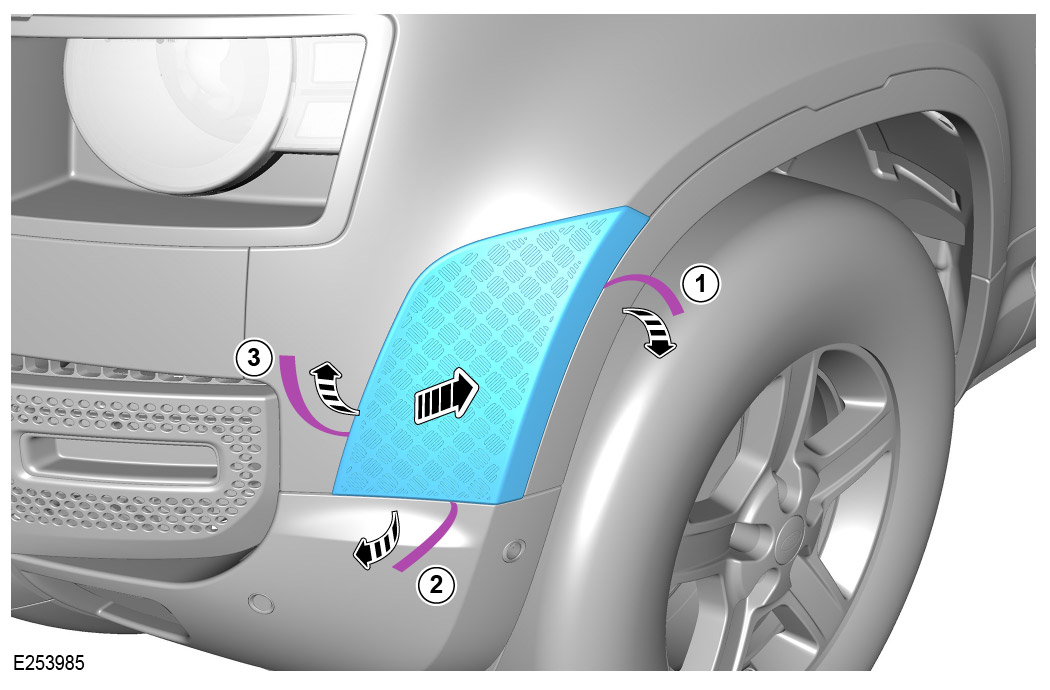
Place the front wheel arch chequer plate (A) on the body for masking purposes only.

2

Check gap from trim.

3

When in position, secure with masking tape and then mask the edge of the chequer plate on the vehicle body with masking tape. Then remove the chequer plate.

4
WARNING
  • Make sure to wear suitable personal protective equipment when using cleaner or adhesion promoter in the following steps.
CAUTION
  • Allow to dry for a minimum of 2 minutes before proceeding to the next step.

Continue to use masking tap along the bumper and wheel arch trim as illustrated. Then using the cleaner (F) supplied in the kit, clean the illustrated area.

5
CAUTION
  • Allow to dry for a minimum of 5 minutes before proceeding to the next step.
NOTE
  • To activate the adhesion promoter, hold the tube between your finger and thumb, squeeze the middle of the tube until you here a crack noise, shake the tube gently and the fluid will flow to the tip.

Using the adhesion promoter (G) supplied in the kit, wipe the illustrated area.

6
CAUTION
  • Control the specified gaps when peeling away the backing from the adhesion strips.
NOTE
  • Firmly push the edges of the front wheel arch chequer plate along the outside edges to make sure good adhesion to the fender.

Remove the masking tape, then install the front wheel arch chequer plate (A). While applying pressure to the chequer plate, peel away the backing from the adhesion strips in the order as illustrated.

7
NOTE
  • Illustration shows Defender 110 / 130 vehicles. For Defender 90 vehicles the rear wheel arch chequer plate is installed to the quarter panel instead of the rear door.

Place the rear wheel arch chequer plate (B) on the body for masking purposes only.

8
NOTE
  • Illustration shows Defender 110 / 130 vehicles. For Defender 90 vehicles the rear wheel arch chequer plate is installed to the quarter panel instead of the rear door.

Check gap from trim.

9
NOTE
  • Illustration shows Defender 110 / 130 vehicles. For Defender 90 vehicles the rear wheel arch chequer plate is installed to the quarter panel instead of the rear door.

When in position, secure with suitable tape and mask the edge of the chequer plate on the vehicle body. Remove the chequer plate.

10
WARNING
  • Make sure to wear suitable personal protective equipment when using cleaner or adhesion promoter in the following steps.
CAUTION
  • Allow to dry for a minimum of 2 minutes before proceeding to the next step.
NOTE
  • Illustration shows Defender 110 / 130 vehicles. For Defender 90 vehicles the rear wheel arch chequer plate is installed to the quarter panel instead of the rear door.

Continue to use masking tap along the lower door trim and wheel arch trim as illustrated. Then using the cleaner (F) supplied in the kit, clean the illustrated area.

11
CAUTION
  • Allow to dry for a minimum of 5 minutes before proceeding to the next step.
NOTE
  • Illustration shows Defender 110 / 130 vehicles. For Defender 90 vehicles the rear wheel arch chequer plate is installed to the quarter panel instead of the rear door.
  • To activate the adhesion promoter, hold the tube between your finger and thumb, squeeze the middle of the tube until you here a crack noise, shake the tube gently and the fluid will flow to the tip.

Using the adhesion promoter (G) supplied in the kit, wipe the illustrated area.

12
CAUTION
  • Control the specified gaps when peeling away the backing from the adhesion strips.
NOTE
  • Firmly push the edges of the rear wheel arch chequer plate along the outside edges to make sure good adhesion to the body.
  • Illustration shows Defender 110 / 130 vehicles. For Defender 90 vehicles the rear wheel arch chequer plate is installed to the quarter panel instead of the rear door.

Remove masking tape, then install the rear wheel arch chequer plate (B). While applying pressure to the chequer plate, peel away the backing from the adhesion strips in the order as illustrated.

13

Place the mirror chequer plate (C) on the mirror for masking purposes only.

14

Make sure the mirror chequer plate is parallel to the mirror body.

15

Make sure the mirror chequer plate is parallel to the mirror body.

16

When in position, secure with suitable tape and mask the edge of the chequer plate on the mirror body. Remove the chequer plate.

17
WARNING
  • Make sure to wear suitable personal protective equipment when using cleaner or adhesion promoter in the following steps.
CAUTION
  • Allow to dry for a minimum of 2 minutes before proceeding to the next step.

Using the cleaner (F) supplied in the kit, clean the illustrated area.

18
CAUTION
  • Allow to dry for a minimum of 5 minutes before proceeding to the next step.
NOTE
  • To activate the adhesion promoter, hold the tube between your finger and thumb, squeeze the middle of the tube until you here a crack noise, shake the tube gently and the fluid will flow to the tip.

Using the adhesion promoter (G) supplied in the kit, wipe the illustrated area.

19
CAUTION
  • Control the specified gaps when peeling away the backing from the adhesion strips.
NOTE
  • Firmly push the edges of the chequer plate along the outside edges to make sure good adhesion to the mirror.

Remove the masking tape, then install the mirror chequer plate (C). While applying pressure to the chequer plate, peel away the backing from the adhesion strips in the order as illustrated.

20
CAUTION
  • Make sure there are no remaining clips left in the vehicle body.
  • Protect the surrounding paintwork and trim to avoid damage.
NOTE
  • This step applies 'ONLY' to Defender 90 / 110 vehicles.

Remove the tail lamp outer finisher. If Antenna is present follow steps 21 to 26. If Antenna is not present continue to step 27.

21

Disconnect electrical connector.

22

Unclip the antenna from the core lamp cover.

23

Remove the discarding paper and peel off the x4 red protective strips from the new antenna bracket (H).

24

Position the antenna bracket (H) over the location features on the new LH tail lamp cover (D). Then gently press down the bracket making sure it sticks to the lamp cover.

25

Clip the antenna into the bracket.

26
CAUTION
  • Check the electrics are working.

Connect the electrical connector.

27

Install the tail lamp outer finisher chequer plate (D).

28

Open tailgate and disconnect door strut.

  1. Release retaining clip by rotating it counter clockwise.
  2. Pull out retaining clip then remove the strut away from the connection point.
29

Measure and mark the centre of the rear bumper.

30

Measure and mark the centre of the rear scuff chequer plate (E).

31

Line up both the centre marks and place the rear scuff chequer plate (E) on the bumper for masking purposes only.

32

When in position secure the chequer plate on the bumper with suitable tape.

33

Mask the edge of the chequer plate on the bumper. Remove the chequer plate.

34
WARNING
  • Make sure to wear suitable personal protective equipment when using cleaner or adhesion promoter in the following steps.
CAUTION
  • Allow to dry for a minimum of 2 minutes before proceeding to next step.

Using the cleaner (F) supplied in the kit, clean the illustrated area.

35
CAUTION
  • Allow to dry for a minimum of 5 minutes before proceeding to next step.
NOTE
  • To activate the adhesion promoter, hold the tube between your finger and thumb, squeeze the middle of the tube until you here a crack noise, shake the tube gently and the fluid will flow to the tip.

Using the adhesion promoter (G) supplied in the kit, wipe the illustrated area.

36
NOTE
  • Firmly push the edges of the rear scuff plate along the removed adhesive strips to make sure there is good adhesion to the bumper.

While holding the scuff plate in position remove the side 'RED' adhesive tab strips on the rear scuff plate (E).

37
NOTE
  • Firmly push the edges of the rear scuff plate along the removed adhesive strips to make sure there is good adhesion to the bumper.

While holding the scuff plate in position remove the top and bottom 'WHITE' adhesive tab strips on the rear scuff plate (E).

38

Connect door strut.

  1. Place the door strut back onto its connection point and insert the retaining clip into the strut as illustrated.
  2. Secure the strut by rotating the retaining clip clockwise to lock into position.
© Land Rover 2016