LAND ROVER ACCESSORY FITTING INSTRUCTIONS

VEHICLE :
PART NO :
KEYWORD :

LAND ROVER

DISCOVERY

MUD FLAPS - REAR

VPLRP0483

FITTING INSTRUCTION

WARNING
  • Accessories which are not properly installed can be dangerous. Read the instructions carefully prior to fitting. Comply with instructions at all times. If in doubt, contact your nearest approved retailer.

VPLRP0483

CAUTION
  • If protective wax has been applied to the vehicle it must be thoroughly removed before starting this procedure.
  • The vehicle must be clean, dry and at workshop temperature. Vehicles moved into the workshop from cold or wet conditions should be dried and left to stand for a minimum of 2 hours.

Rear Mudflaps (Bill of Materials)

Tooling

Tooling
Manual screwdriver kit
Ruler
Sharp pick (for position marking)
Drill (Ø10mm, 15mm Depth)
Retaining nut removal and installation tool
Torque Wrench/Screw Driver (range up to 5Nm). Recommended GE5.3: 1/4 dr torque screwdriver for 56 - 451 N/cm (0.56 - 4.5 Nm)
Oscillating cutting tool
Paint markers for metal
Fitting Instruction
NOTE
  • Left side illustrations shown. Right side is similar.
  • Wheels are not shown in graphics for clarity.
1
WARNING
  • Make sure to support the vehicle using axle stands.

Raise and support the vehicle on a suitable lift.

  • For additional information, please refer to the official Workshop Manual. Jacking and Lifting (100-02)
2

Remove and discard the screw.

3

Release the wheel arch liner.

  1. Remove and retain x2 screws.
  2. Release the wheel arch liner.
4
WARNING
  • Make sure to wear suitable personal protective equipment.
CAUTION
  • Be aware of components behind the bumper cover when drilling. Make sure to use a 15mm drill stop.

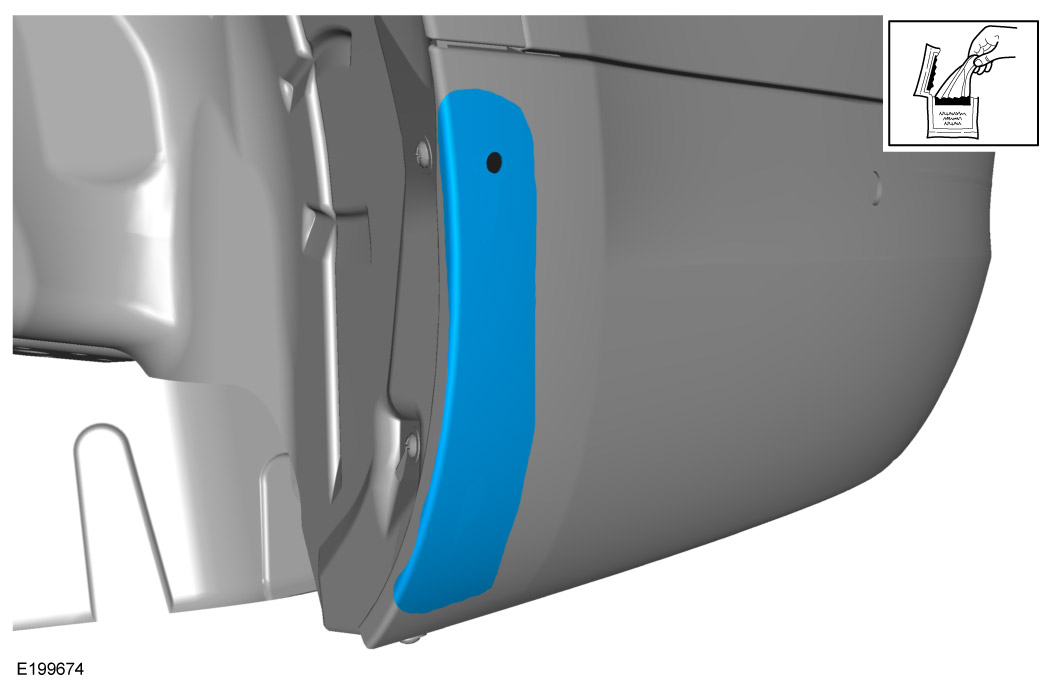
Using a 10mm drill, drill a hole in the bumper cover in the location illustrated.

  1. Measure 38mm down from the radius edge.
  2. Measure 20mm in from the surface as illustrated.
5

Remove and discard the retaining nut.

6

Install the supplied retaining nut (E).

7
NOTE
  • Take care not to damage bumper A-surface edge when cutting.

Cut the bumper bracket.

  1. Measure and mark 15mm down and 17mm across as seen on graphic.
  2. Cut the bumper bracket along the marked lines.
8
WARNING
  • Make sure to wear suitable personal protective equipment.

Using the supplied cleaner (G), clean the highlighted area and leave to dry for 2 minutes before continuing to the next step.

9
WARNING
  • Make sure to wear suitable personal protective equipment.
  • Promoter (H) should only be applied to the surface illustrated that is covered by the mudflap. If applied to area not covered by the mudflap, this will make the paint finish dull.

Apply the supplied adhesion promoter (H), to the highlighted area and leave to dry for 5 minutes before continuing to the next step.

10

Position and clip in shield (A1) onto mudflap (A).

11

Remove the backing from the adhesive tape.

12
WARNING
  • Tightening the fixing studs above the specified torque level will result in joint failure / stud breaking.
  • Any claims due to improper torque assembly will be rejected.
CAUTION
  • Make sure that the mudflap is correctly positioned against the rear bumper.
  • Use the Jaguar Land Rover approved torque wrenches to achieve the required torque.

Install rear mudflap.

  1. Position the mudflap against the bumper.
  2. Secure the mudflap using nut (F) and washer (D).
  3. Using a suitable hand torque wrench, tighten the nut to the required torque. Apply a paint mark (white/yellow) on the stud, nut and washer when the right torque is reached.
    1. Torque: 2Nm
13

Secure the wheel arch liner back into position and tighten screws.

14

Secure the mudflap using bolt (C) and washer (D).

  • Torque: 2Nm
15
CAUTION
  • Make sure the retaining clip is installed over the mudflap and the lower trim panel.

Using a suitable tools, install the supplied retaining clip (I).

© Land Rover 2016