LAND ROVER ACCESSORY FITTING INSTRUCTIONS

VEHICLE :
PART NO :
KEYWORD :

LAND ROVER

DISCOVERY

VERSATILE ROOF RACK

VPLRR0153 - VPLRR0192 / VPLRR0157 / VPLRR0166 / VPLRR0167

FITTING INSTRUCTION

WARNING
  • Accessories which are not correctly installed can be dangerous. Read the instructions carefully prior to installation. Comply with instructions at all times. If in doubt, contact your nearest approved retailer.
Kits Required Part Number Superseded By
Versatile Roof Rack VPLRR0153 VPLRR0192
Ditch Finishers - Front VPLRR0157
Ditch Finishers - Rear VPLRR0166
Ditch Finishers - Fixing Sealing Kit VPLRR0167

Versatile Roof Rack kits for vehicles 'WITHOUT' roof rails installed (Bill of Material)

Versatile Roof Rack kits for vehicles 'WITH' roof rails installed (Bill of Material)

Warnings / Cautions / Notes

WARNING
  • Do not exceed 130 km/h or 80 mph when the versatile roof rack is installed.
  • Do not use elastic straps (bungees) to secure loads onto the versatile roof rack.
  • All straps that are used must be maintained in a good working order.
  • Make sure that all cargo and accessories are installed securely to the versatile roof rack. Inspect the security of the attachment of the load to the versatile roof rack regularly during the trip.
  • Items that may produce a significant lifting force (for example surfboards) must be mounted in such a way as to minimize this force.
  • Where specialized accessories are available for securing loads (for example cycle carriers or ski carriers), these must be used.
  • Seek the assistance of another person when installing the versatile roof rack.
  • Seek the assistance of another person when loading and unloading, heavy, or awkward, items to and from the versatile roof rack.
  • The handling characteristics of the vehicle will change when a roof load is installed, driving techniques should be altered to suit this changed condition when, for example, braking and cornering.
  • Be aware of the extra vehicle height.
  • Negotiate sharp bends with caution and moderate cornering speeds.
  • Avoid harsh acceleration and braking.
CAUTION
  • When the 'Versatile Roof Rack' (C) and the 'Versatile Roof Rack Optional Cross Bar' (K) are installed, the roof opening panel can only be partially opened.
  • When carrying loads that run the entire length of the 'Versatile Roof Rack', the roof opening panel should not be used.
  • Do not use automated vehicle washes with the 'Versatile Roof Rack' installed.
NOTE
  • Obey local regulations regarding carrying on the roof of a vehicle.
  • Removing the versatile roof rack, when not in use, will improve fuel economy.
  • It is very important to maintain the equipment in good working order.
  • Keep the instructions in a safe place for future reference.
Fitting Instruction
NOTE
  • Left side is shown. Right side is similar.
1

Inspect to see if your vehicle has 'Roof Rails' already installed.

  • If the vehicle does 'NOT' have roof rails installed, complete steps 2 to 11 and then jump and proceed from step 20.
  • If the vehicle does 'HAVE' roof rails installed, jump and proceed from step 12.
2
CAUTION
  • Take care to avoid damage to the body paint.

Use a suitable plastic trim tool to remove the rear ditch finisher. Repeat step for the other side of the vehicle.

3
CAUTION
  • Take care to avoid damage to the body paint.

Use a suitable plastic trim tool to remove the front ditch finisher. Repeat step for the other side of the vehicle.

4
CAUTION
  • Take care to avoid damage to the body paint.

Remove x6 front ditch finisher location fastenings. Repeat step for the other side of the vehicle.

5

Remove all foam and adhesive tape residue before cleaning the highlighted surface. Repeat step for the other side of the vehicle.

6

Install the 2 front ditch finishers (B) to the vehicle. Follow steps 7 to 9.

7

Remove the protective strips from x6 sections of adhesive tape. Complete step on both the front ditch finishers (B).

8

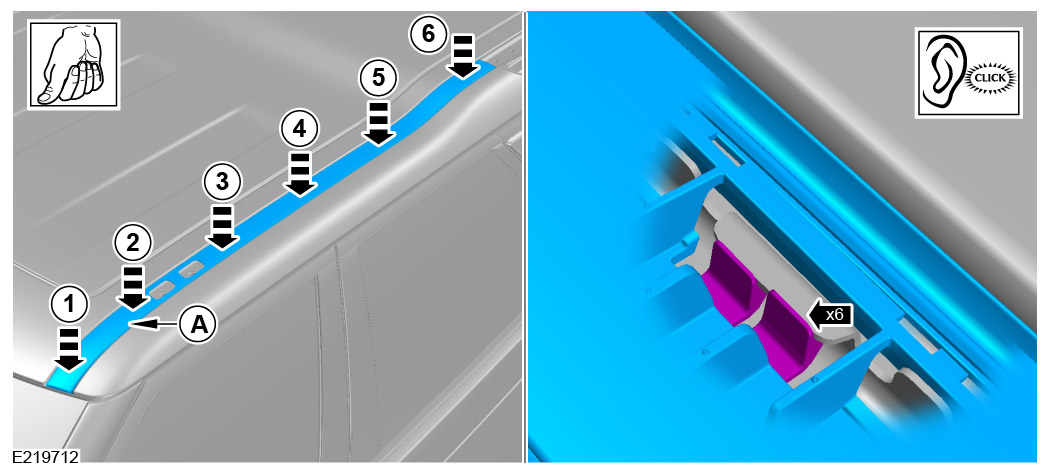
Install the front ditch finisher (B) to the vehicle. Follow the clip order as illustrated. Make sure the location tabs align with the recesses in the vehicle body. Repeat step for the other side of the vehicle.

9

Make sure both the front ditch finishers are positioned against the upper windshield seal as illustrated.

10

Remove the protective strips from x3 sections of adhesive tape on the rear ditch finishers (A).

11

Install the rear ditch finisher (A) to the vehicle. Follow the clip order as illustrated. Repeat step for the other side of the vehicle.

12
NOTE
  • Steps 12 to 19 are for vehicles with roof rails installed.
  • The roof rail finishers will be discarded when they have been removed.

Remove the roof rail finishers from the roof rails at the x6 illustrated locations.

  1. Drill a hole in the roof rail finisher. Take care to avoid damage to the roof rails.
  2. Using a suitable tool, remove the roof rail finisher.
  3. Discard the roof rail finisher.
13

Remove x6 fixings that attach the roof rail to the vehicle and remove roof rail. Repeat step for the other side of the vehicle.

14

Remove x10 roof rail brackets from the vehicle as illustrated.

15
CAUTION
  • Take care to avoid damage to the body paint.

Use a suitable plastic trim tool to remove the rear ditch finisher. Repeat step for the other side of the vehicle.

16

Remove all foam and adhesive tape residue before cleaning the highlighted surface. Repeat step for the other side of the vehicle.

17

Install x2 fixings (D) in the location as illustrated. Repeat step for the other side of the vehicle.

  • Torque: 10Nm
18

Remove the protective strips from the x3 sections of adhesive tape on both the rear ditch finishers (A).

19

Install the rear ditch finisher (A) to the vehicle. Follow the clip order as illustrated. Repeat step for the other side of the vehicle.

20

Make sure the rubber seals are installed at x2 locations on each of the x4 rack supports (E).

21

Look at the labels on each of the x4 rack supports (E) to find the location identifier (FL, FR, RR, RL). The rack supports must be installed at the correct location on the vehicle.

22
CAUTION
  • Make sure the rack supports are installed at the correct location on the vehicle, as illustrated, by using the location identifier on each of the 4 rack supports.

Install x4 rack supports (E) to the roof of the vehicle using fixings (F) and washers (N).

  • Torque: 32Nm
23

Prepare the versatile roof rack fasteners.

  1. Assemble x2 fixings (F) into a spacer plate (G). Repeat step to create x4 spacer plate and bolt assemblies.
  2. Install the spacer plate and bolt assemblies into the versatile roof rack (C) at the x4 locations as illustrated.
  3. Identify x4 nut plates (H) so these are ready to install when the versatile roof rack is lifted onto the vehicle roof.
24
CAUTION
  • Make sure the versatile roof rack finishers are cut to a length so they fill the entire length of the slot in each cross bar. If gaps remain there will be noise generated as the vehicle is being driven.

Install the versatile roof rack finishers (M) into each cross bar by pushing down along the length of the finisher. Cut the versatile roof rack finishers to the required length.

25
CAUTION
  • With the versatile roof rack optional cross bar (K) installed, the roof opening panel can only be partially opened. The bump stops will limit the movement of the roof opening panel.
NOTE
  • If the versatile roof rack optional cross bar (K) will be used then complete steps 25 to 27 before continuing at step 28. If the versatile roof rack optional cross bar is not required then continue from step 28.

Install x2 bump stops (J) to the versatile roof rack optional cross bar (K) as illustrated.

  • Torque: 3Nm
26

Install the versatile roof rack finisher into the versatile roof rack optional cross bar (K) by pushing down along the length of the finisher. Cut the versatile roof rack finisher to the required length.

27
CAUTION
  • The fixings must be tightened with the torque tool (L) until the pointer indicates that a torque of 11Nm has been achieved.

Install the versatile roof rack optional cross bar (K) to the versatile roof rack (C) using the supplied torque tool (L).

  • Torque: 11Nm
28
WARNING
  • This step requires 2 people.

Lift the versatile roof rack (C) over the vehicle roof and then lower into position onto the x4 rack supports (E).

29

Install the nut plates (H) to the spacer plate and bolt assemblies at the x4 locations as illustrated. Fasten the fixings hand tight at this stage.

30

Make sure the versatile roof rack is aligned correctly on the vehicle roof.

31
CAUTION
  • Take care to avoid damage to the body paint.

Tighten x8 fixings (F) to the correct torque.

  • Torque: 32Nm
32

Make sure all the rear and front ditch finishers are installed correctly.

33
WARNING
  • After covering the indicated distances, check the torque of all the versatile roof rack fixings.

Distances at which torque checks are required.

  • 60 km or 40 miles.
  • 250 km or 150 miles.
  • 1000 km or 600 miles.
34
WARNING
  • The load must be evenly distributed over the area of the versatile roof rack as illustrated. The center of gravity of the load must be kept as low as possible as illustrated.
  • The maximum load that can be placed on the versatile roof rack is 60 kg or 132 lbs.
  • Do not overload the versatile roof rack.
  • Do not exceed the recommended gross vehicle weight (GVW).
  • Do not load cargo, or accessories, outside of the width of the versatile roof rack.
  • Loads that overhang the ends of the versatile roof rack must conform to all relevant local laws and by-laws.
NOTE
  • The weight of the versatile roof rack is 25 kg or 55 lbs.

Observe weight limits.

© Land Rover 2016